Team:Freiburg Bioware/Project/Methods
From 2010.igem.org
(→Infectious titer) |
(→Infectious titer) |
||
| Line 447: | Line 447: | ||
[[Image:Freiburg10_QPCR.png|thumb|Fig.17: QPCR|500px|left]] | [[Image:Freiburg10_QPCR.png|thumb|Fig.17: QPCR|500px|left]] | ||
| - | < | + | |
| + | <br> | ||
| + | <br> | ||
| + | |||
| + | <br> | ||
| + | |||
| + | |||
| + | <br> | ||
| + | |||
| + | <br> | ||
=Protocols; Standard Operating Procedures= | =Protocols; Standard Operating Procedures= | ||
Revision as of 03:22, 28 October 2010
Methods
Method Development
Purification of AAV particles
IMAC purification via Viral Brick: The Histidine Affinity Tag Loop Insertion
Introduction of affinity tags to recombinant proteins is a widely used method for protein purification. One of the most prominent tags is the so-called His-tag comprised of multiple histidine residues fused to the N- or C-terminus of the target protein.
The high binding affinity of histidine towards metal is exploited for the purification of proteins via the so called „Immobilized Metal Ion Affinity Chromatography“ (IMAC): Cell extract containing the recombinant protein is applied to a column containing immobilized Ni2+ ions. The His-tags bind the Ni-Ions while other cellular proteins can pass the column. Purified proteins can then be eluted with high concentrations of imidazole which displaces the histidine residues while lower concentration can be used to wash away unspecifically bound proteins (MC Smith et al. 1988), (Hoffmann and Roeder 1991). Contamination of viral particles by cellular proteins could interfere with various in vitro and in vitro techniques. In 2007, Koerber et al. demonstrated insertion of a His-tag into a surface-exposed AAV loop at amino acid position 587 in the Cap protein and successfully purified recombinant viruses using IMAC. For our Virus Construction Kit, we provide the His-tag motif in the ViralBrick standard, allowing an easy insertion into the 453 and/or 587 loop. Successful particle purification was proven by qPCR and ELISAs.
Specific Biotinylation via ViralBrick: The Biotinylation Acceptor Peptide Loop insertion
The BAP (Biotinylation Acceptor Peptide) that we included in our Virus Construction Kit is a 15 amino acid peptide. It was identified by Schatz et al. in 1993 using a library screening approach and published under the number #85. Within the sequence GLNDIFEAQKIEWHE, a central lysine can be specifically biotinylated by i.e. the prokaryotic enzyme biotin synthetase, encoded by the BirA gene of E. coli. Specific biotinylation of this peptide sequence can also be performed in vivo by contransfecting a plasmid with the BirA gene as described for the AAV by Arnold et al. in 2006 or by an in vitro coupling approach using the purified Escherichia coli enzyme biotin ligase (BirA).
Experiences from under the hood: Cell Culture
Optimizing the transfection protocol
The optimization of the lab standard protocols was one of our fields of investigation. Besides optimizing the handling of our different cell lines and working steps, the transfection protocol was examined. One of the most remarkable lessons after several transfections was the crucial handling of the AAV293 cells: Once over approximately 80 % confluency, the cells are no longer competent for transfection. Another achievement in method development was the determination of the optimal plasmid amounts. The best results were obtained using 3.3 µg of each plasmid, therefore this parameter was modified in our standard protocol. After transfecting AAV293 cells, we were able to detect the Ca2+-DNA conglomerates in the medium. The toxic side effects of these aggregates were also confirmed. Not only the medium had to be changed, but also washing with PBS was essential to keep the cells alive.
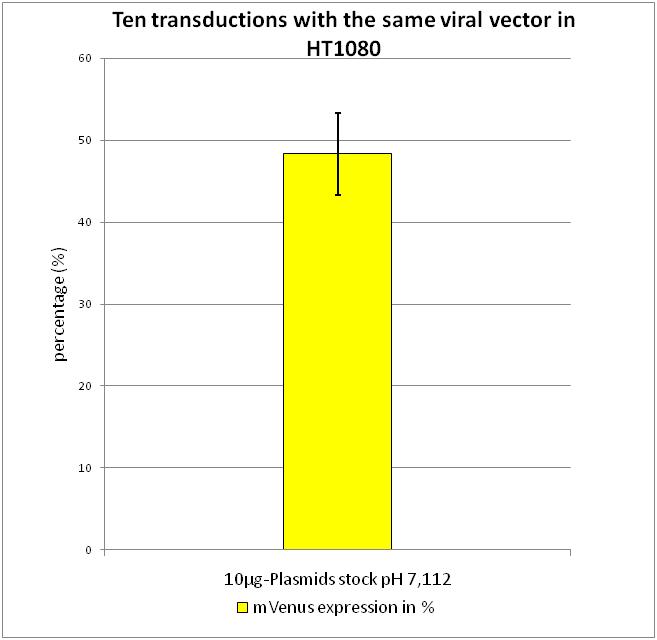
The most critical step in transfection proved to be the exact pH of the 2x Hepes buffered-saline (HBS) buffer, in which the Ca2+ ion-DNA complexes precipitate. Our initial buffer had a pH of 7.112. To determine the best pH-value for transfection, buffers with different pH values were used, the produced viral particles were harvested and flow cytometry we used to determine the optimal pH value. Transfection, harvesting and transducton were performed according to the modified standard protocol.
After confirming that the highest amount of viral particles was created with the pH 7.112 2xHBS, we wanted to determine how the reproducibility of the flow cytometry data and calculated standard derivations.
Flow Cytometry Analysis
After transduction with equal volumes of created viral stock, flow cytometry was performed according to FACS protocol. As it can be seen there is only a small standard derivation of 6.19 % in mVenus positive cells. By combining the results gained from the experiments described above, we were able to evaluate the standard protocol described in Material and Methods.
Imaging AAV: EM/AFM pictures
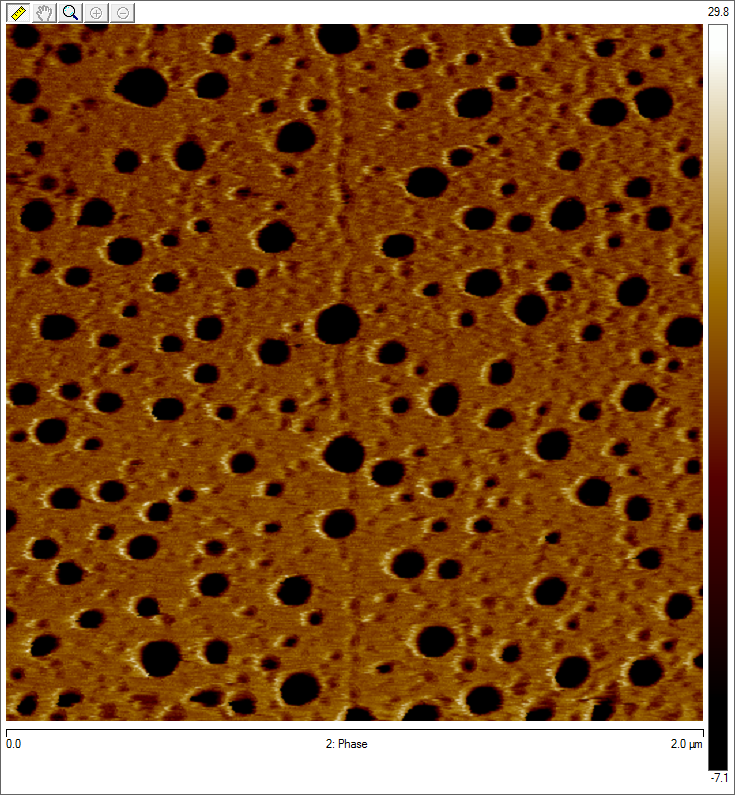
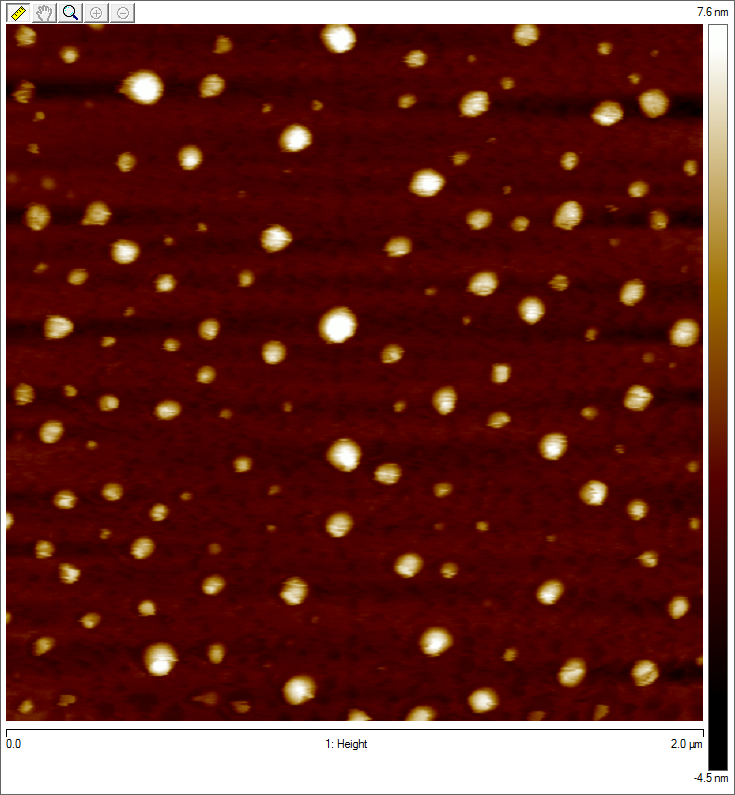
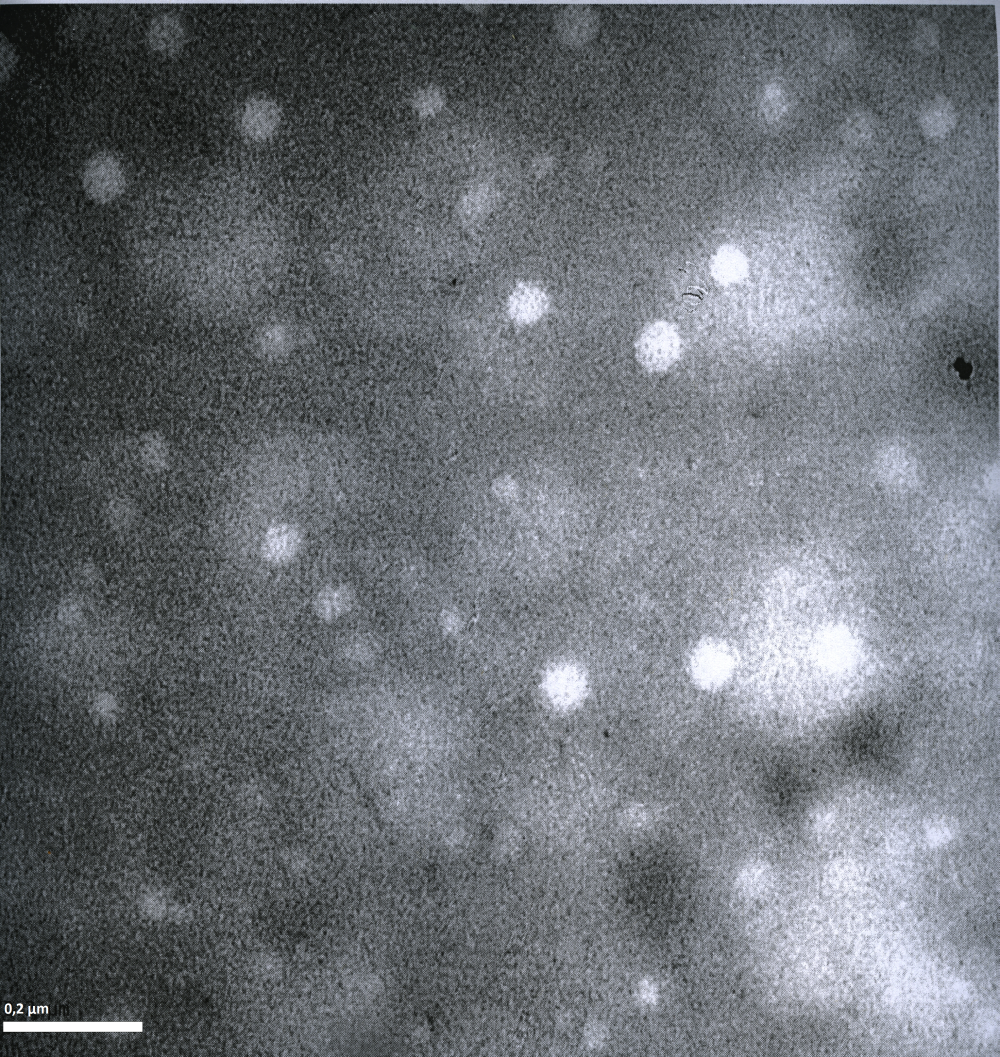
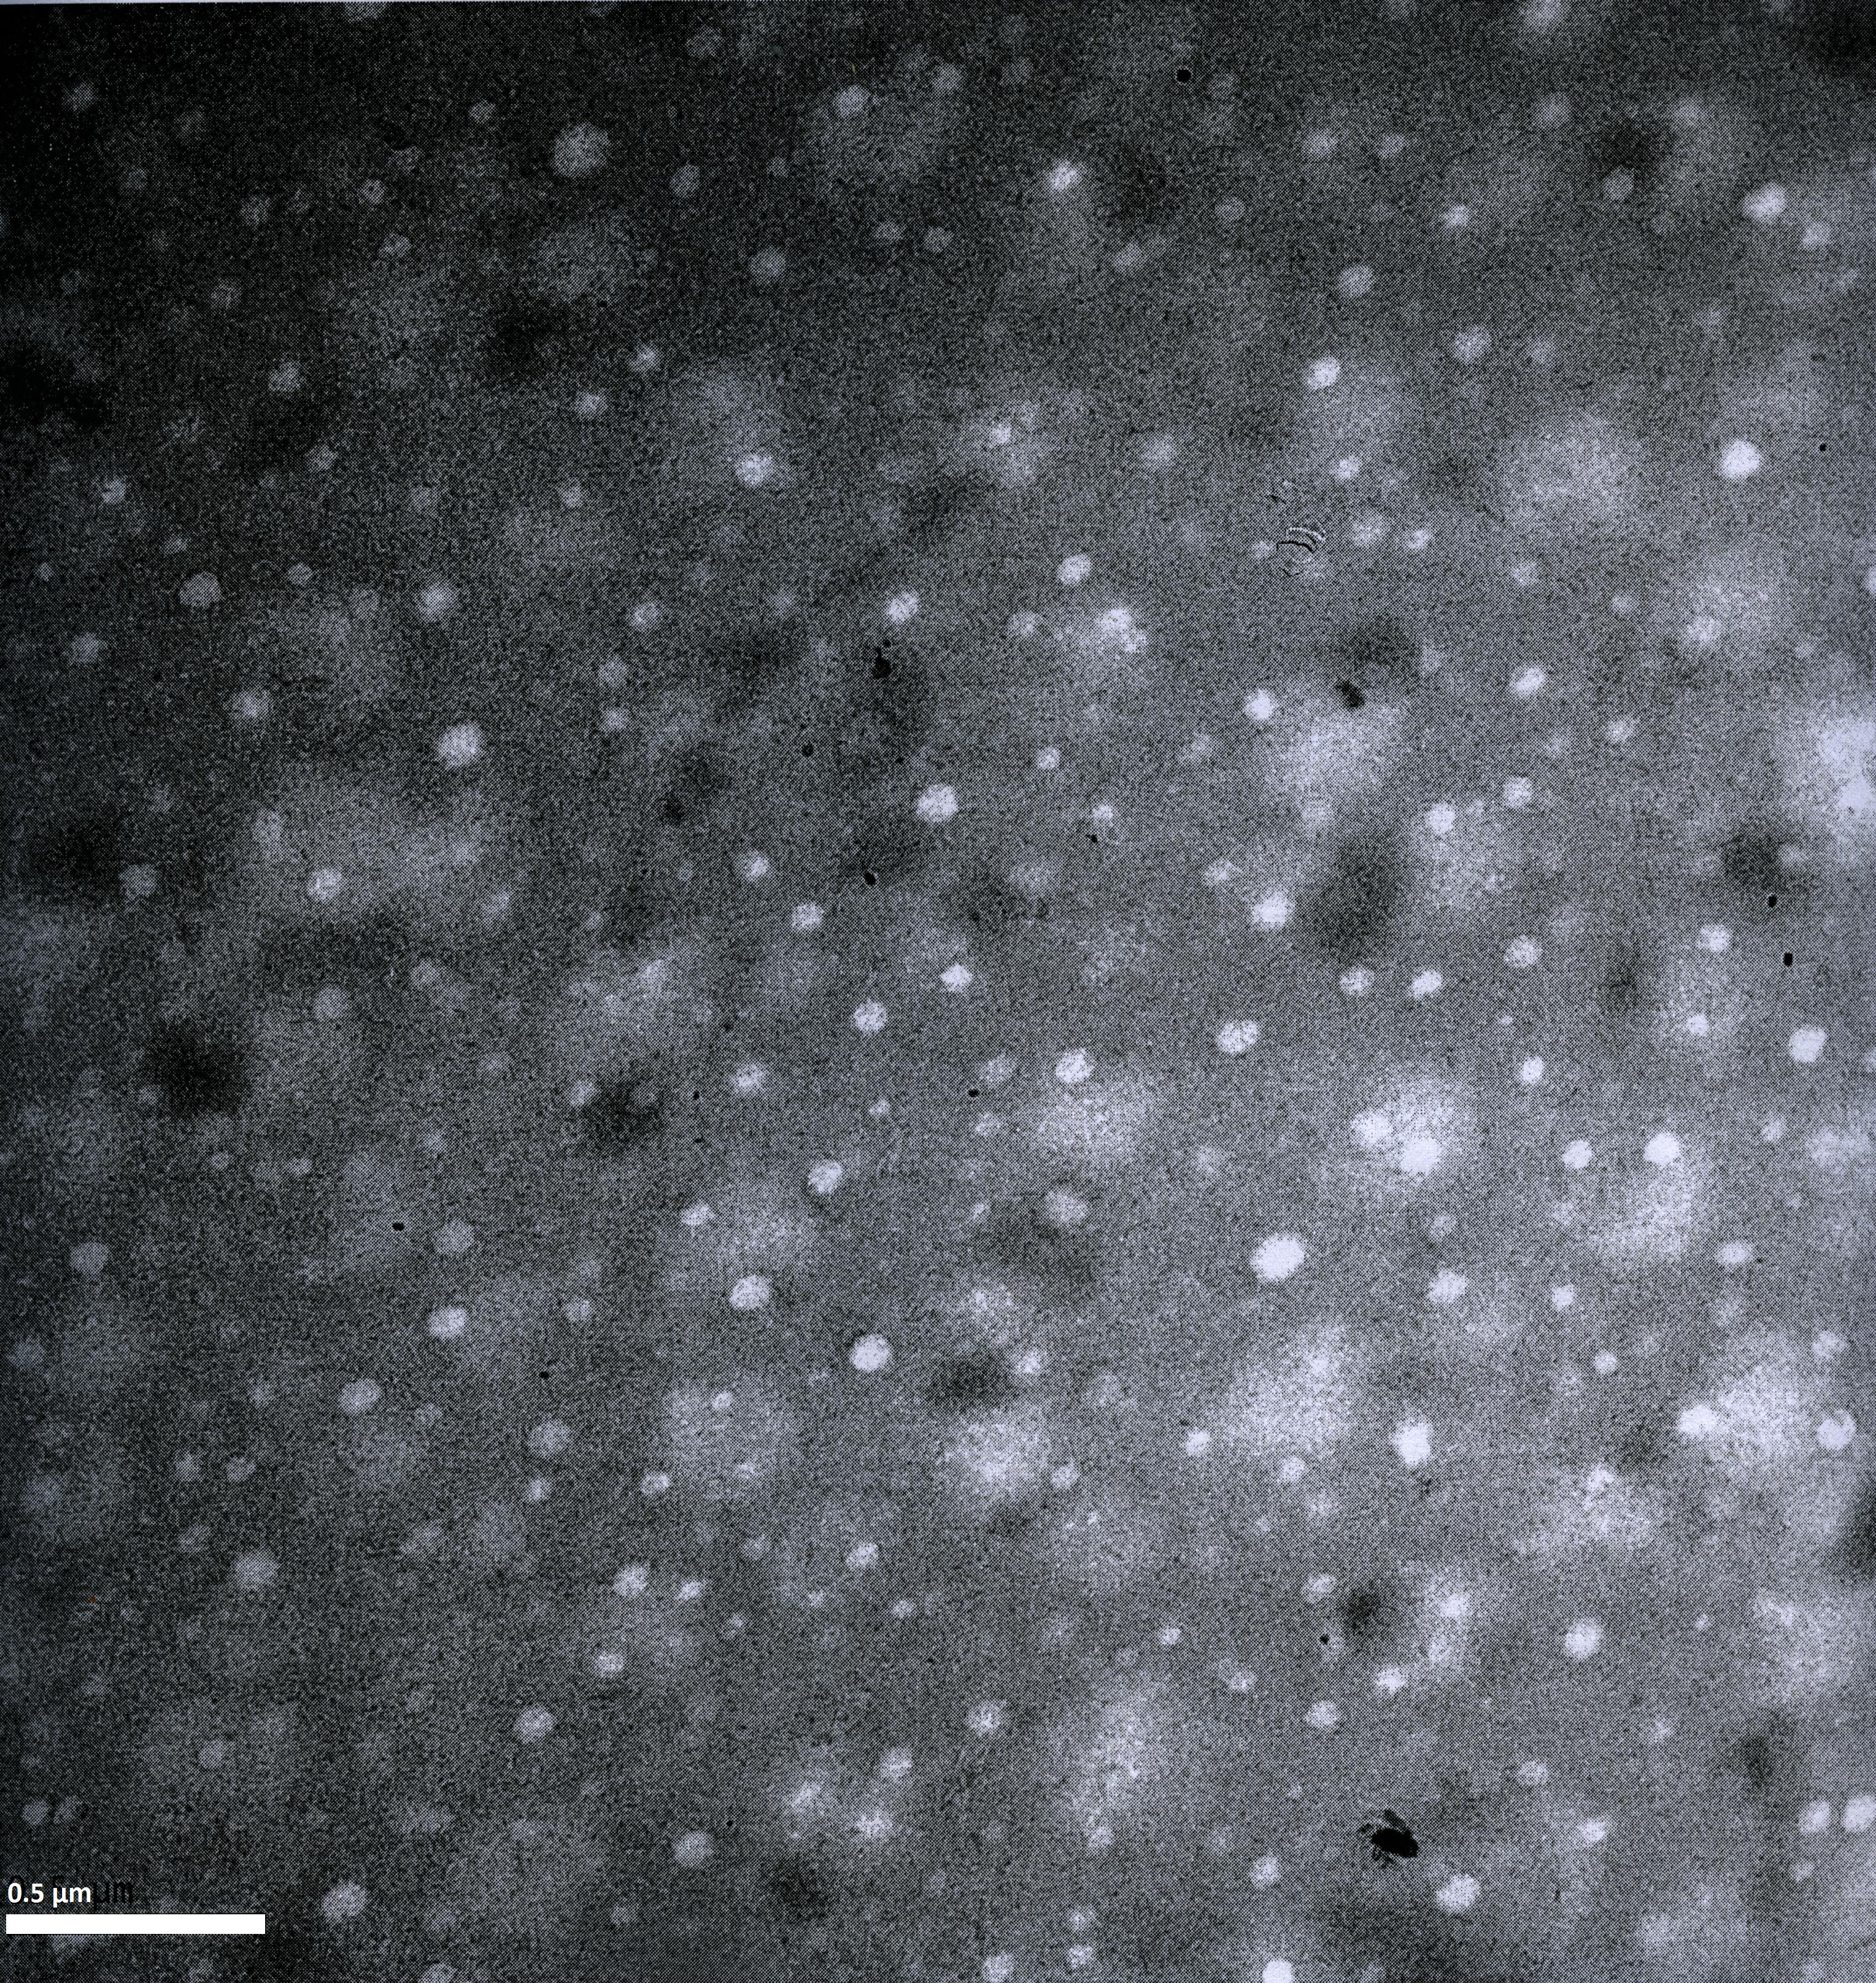
To visualize our artificial AAV particles and to test their structural integrity, we aquired transmission electron microscopy as well as atomic force microscopy pictures from our virus samples:
AFM
EM
Particles appear too large in size, according to Chen et al. this phenomenon might be due to particle aggregation.
References
1. Chen H. Atomic force microscopy of recombinant adeno-associated virus-2 prepared by centrifugation. Scanning. 29(5):238-42. Available at: http://www.ncbi.nlm.nih.gov/pubmed/17828711.
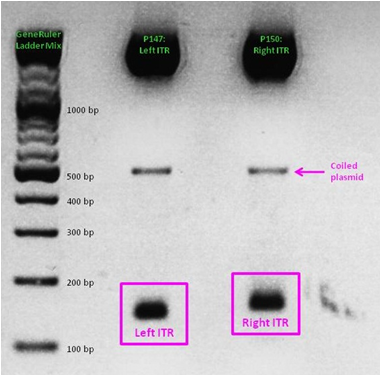
ITR cloning
As a part of our AAV vector plasmids modularization, we needed to extract the sequences making up the ITRs at each end of the vector and clone them into an IGEM-compatible backbone. Due to the ITRs’ strong secondary structures, none of our PCR-based approaches worked, even when special buffers and strand-displacing enzymes were used. External companies were unable to synthesize or even sequence the ITRs. Taking advantage of NotI and PstI restriction sites flanking the ITRs, we worked out a complex cloning strategy that finally led to functional ITR motives in the RFC10 standard.
See also: Hannas' ITR Diary
Serum-free cell culture medium
Introduction
Serum-free media allow users to standardize their cell culture conditions. No animal proteins or animal-origin constituents as e.g. in FCS (fetal calf serum) are present.
The AAV-293 cells we used for AAV-2 particle production are usually grown in (among other chemicals, such as nutrients, antibiotics, growth factors) serum-supplemented DMEM medium. Regarding western blots, size exclusion chromatography and other (purification) methods, the undefined and also highly variable serum products can disturb or interfere with these methods. Therefore it is useful for many sensitive applications to grow AAV-293 cells in serum-free medium.
Since the long-term goal is the application of the viral vectors human patients, we are also trying to develop new methods to produce pure, uncontaminated AAV particles. The use of FCS to supplement cell culture medium for AAV particle production is problematic because even smallest amounts of animal antigens in the administered drug could lead to a strong immune response in patients.
Testing serum free medium
After serum free medium was obtained, the AAV-293 cells adapted to different growth conditions had to be accustomed to the new growth conditions step by step, starting with 25 % serum-free medium, e.g. 15 ml DMEM (not serum-free) + 5 ml serum-free medium (Gibco FreeStyle™ 293 Expression Medium, Invitrogen) in T75 flasks. Each step takes at least 1 passage and we managed to raise the serum-free ratio to 100 % over 7 passages.
100% serum-free cells grow slower compared to the serum-supplemented ones and we had to check their viability regularly via microscopy since the medium does not contain a pH indicator.
Results
Even though cells grew slower and handling was more difficult, we successfully cultivated AAV-293 cells in serum-free medium. The cells were used for AAV production, and we produced intact virus particles as in case of cells grown in FCS-supplemented medium. Production efficiencies cannot be directly compared because after seeding the cells for transfection, they grow slower compared to the AAV-293 in serum-containing medium.
Established Methods
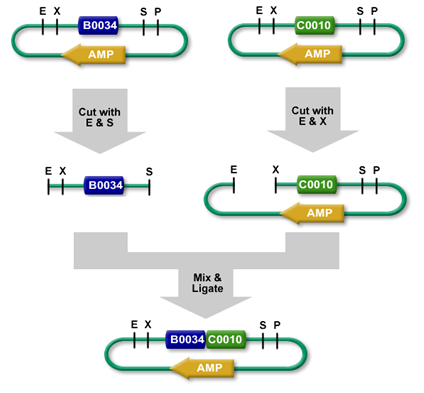
Cloning
Polymerase Chain Reaction
The Polymerase Chain Reaction (PCR) is a technique to amplify specific DNA sequences delivered by a DNA template independent of a bacterial system. Specially designed primers define the desired target sequence. These primers serve as starting points for the polymerase which then extends the newly synthesized DNA strand.
The DNA template strand is heat-denaturated at 95 - 98 °C to produce single-stranded DNA. The next step requires the temperature to be lowered to allow the forward and reverse primers to anneal to their complementary bases on the DNA template. According to the interaction energies, this temperature is defined by the length and the GC content of the primers. With increasing temperature, the polymerase binds the primed regions and elongates the primers. After a given timeframe, the temperature is raised again to denaturate the double strand and to start a new cycle.
PCRs were performed using Mastercycler gradient (Eppendorf, Hamburg, Germany), Mastercycler personal (Eppendorf) and Px2 ThermoHybaid devices (Thermo Fisher, Waltham, MA, USA). PhusionTM Polymerase together with corresponding buffer and dNTP mix were obtained from New England Biolabs (New England Biolabs, Ipswich, MA, USA).
Link to NEB: www.neb.com
Site-Directed Mutagenesis
The Site-Directed Mutagenesis (SDM) is used to mutate a specific base inside the plasmids sequence (Hutchison et al. 1978). Therefore, forward and reverse primers, which prime at the same site and contain a mismatch at the specific base in terms of the original structure are required. This mismatch defines the new base through which the original one is replaced.
As with Polymerase Chain Reaction, the site-directed mutagenesis works by amplifying the desired construct while incorporating the primers. The DNA double-strand is heat-denaturated which allows primers to bind to the single-stranded sequences after lowering the temperature. Designing a mismatch within the primers sequence leads to replacement of the unwanted base in later cycles of denaturating, annealing and elongation. After the SDM program is finished, digestion with DpnI is necessary to destroy parental methylated and hemi-methylated plasmid strands which do not contain the desired base pair exchange. For SDM, the QuikChange Lightning Site-Directed Mutagenesis Kit (Agilent Technologies, Santa Clara, CA, USA) and QuikChange Site-Directed Mutagenesis Kit (Agilent Technologies) were used.
Link to Agilent: http://www.genomics.agilent.com
Ligation
Using restriction enzymes, digested plasmid fragments can be reassembled into a new vector by ligation (see: Digestion). Ligases (Lehman 1974) connect complementary overhangs of fragments originated from digestion. The ligase catalyzes bond formation between the 5'phosphoryl group and the hydroxyl group of the 3'end, therefore connects the fragments. This reaction requires energy depending on the ligase used, T4 DNA Ligase for example requires ATP. The new vector now holds the genetic information of both the opened vector (minus the cut out fragment), and the insert.
Transformation
Transformation is the process in which competent bacterial cells incorporate plasmid-DNA. DNA obtained from previous steps is added to competent cells. During incubation on ice, the plasmids attach to the cell surface. To make the cells assimilate the plasmids, the tubes are heat-shocked for a short time at 42 °C to allow the plasmids to pass the cell membrane. Although the mechanism is still not fully understood, it is probably related to a decrease in the cell's membrane fluidity (Panja et al. 2008). After incubation on ice in order to regenerate the cells LB or DYT media is added and the tubes are incubated on a shaker at 37 °C to establish antibiotic resistance. After that, the cells are pelleted via centrifugation, most of the supernatant is discarded, and the pellet resuspended in the remaining rest of the media and plated on an agar plate containing the appropriate antibiotic. For transformation, BL21, XL1-blue and XL-10 Gold cells were used.
|
Table 2: Genotypic characterization of bacterial strains used for transformation.
|
|
|
Cell strain
|
genotype
|
|
BL21
|
E. coli B F–dcm ompT hsdS(rB– mB–) gal
|
|
XL1-blue
|
recA1 endA1 gyrA96 thi-1 hsdR17 supE44 relA1 lac [F´ proAB lacIqZΔM15 Tn10 (Tetr)]
|
|
XL10-Gold
|
TetrrΔ(mcrA)183 Δ(mcrCB-hsdSMR-mrr)173 endA1 supE44 thi-1 recA1 gyrA96 relA1 lac Hte [F´ proAB lacIqZΔM15 Tn10 (Tetr) Amy Camr]
|
PCR purification
PCR purification is performed to DNA samples free of primers, salts, nucleotides, enzymes or other contaminations. This is based on relatively low binding properties of these impurities to the membrane which is used within the purification. The PCR product together with a specific buffer which allows DNA-binding to the membrane is added on a column, which is centrifuged. The flow-through is discarded. Elution of the the PCR product is performed after washing the column several times. For PCR purification, QIAquick PCR Purification Kit (QIAGEN, Hilden, Germany) was used. Used protocol: QIAquick ® (QIAGEN, Hilden, Germany)
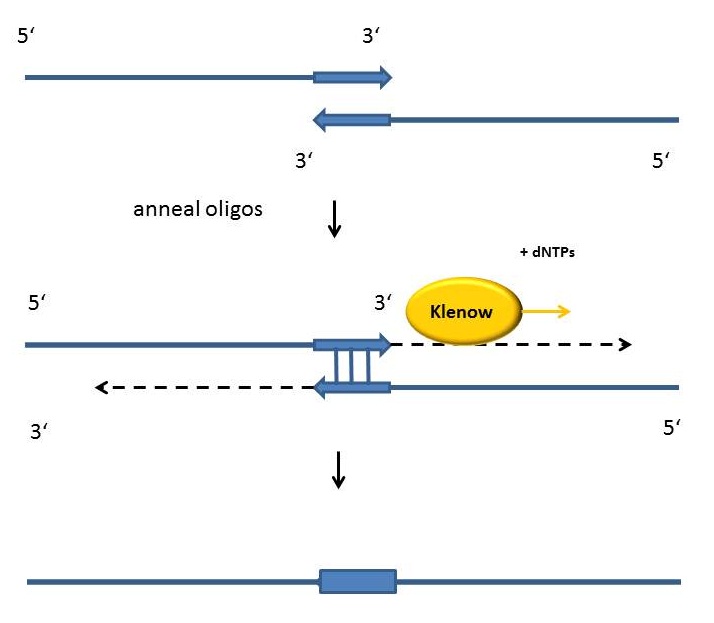
Hybridisation of Oligos
Renaturation and hybridization reactions lead to the pairing of complementary single-stranded nucleic acids. The main technique of a hybridization is that complementary strands of nucleic acids anneal after a heating and cooling down procedure. Denaturation of the double-stranded DNA unwinds it and separates it into single strands through the breaking of hydrogen bonds between the bases. In a renaturation step, the single strands finally hybridize and build double helices. Hybridizations can be performed using a Thermoblock or a Thermocycler like we did for our experiments.
Fill-in-reactions
Fill-in reactions can be performed using a polymerase in order to create dsDNA. In comparison to a conventional PCR, the product is not obtained by amplification, but by fill-in 5'-overhangs of ssDNA using the Klenow-fragment [Figure]. This protein fragment is a product of the DNA polymerase I from E. coli, when cleaving it enzymatically by the protease subtilisin. It retains a 5' → 3' polymerase activity and a 5'→ 3' exonuclease activity, but is lacking the 3'→5' exonuclease activity. Therefore, the protein fragment is useful for many applications like DNA labeling by fill-in 5’-overhangs or strand displacement amplification (in this method the exo- klenow-fragment extends the 3'-end of a nicked strand and displaces the downstream DNA strand). After starting the PCR program, the samples are heated for 15 minutes at 94°C following an incubation time of 3 minutes at 94 °C. As soon as the samples are cooled down at 37 °C 1 µl Klenow-fragment (NEB, Frankfurt am Main) is added. The reaction is carried out usually in the same buffer as used for the digestion. While incubating the samples at 37°C for one hour, the fill-in reaction is finally running.
DNA gel electrophoresis
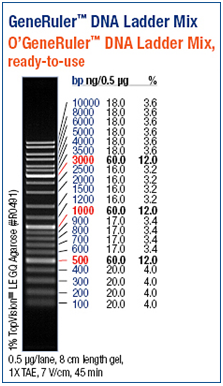
Agarose gel electrophoresis and polyacrylamide gel electrophoresis are common analytical techniques to identify, quantify and purify nucleic acids. The usage of the two types of gels depends on the size of the fragments. Whereas an agarose gel is used to separate relatively long DNA molecules from 100 kDa up to 500 kDa, a polyacrylamide gel can also be used molecules shorter than 100 kDa. For our experiments we separated the DNA fragments by 1% - 1,5 % Agarose gel electrophoresis (Thermo EC Classic Series, Thermo Scientific) using GelredTM (Hayward, USA) for staining. GelredTM is a fluorescent nucleic acid gel stain which intercalates with nucleic acid and replaces the usage of the highly toxic ethidium bromide (EtBr) bit by bit. http://www.biotium.com
As a DNA ladder we used the GeneRulerTM DNA Ladder Mix (Fermentas, Germany).
Vector Dephosphorylation
A higher amount of vector backbone in cloning strategies can be reached by using a Phosphatase like the Antarctic Phosphatase (NEB, Frankfurt am Main, Germany). This enzyme catalyzes the removal of 5´ phosphate groups from DNA, RNA, rNTPs and dNTPs. [http://www.neb.com]. Dephosphorylated fragments cannot religate due to the lack of 5´ phosphoryl termini which are required by ligases. The dephosphorylation needs to be performed after digestion of the vector and before separating the fragments via agarose gel.
Gel Extraction
This technique is used to extract DNA fragments gained of previous cloning advances of 70 bp up to 10 kb after they have been separated by gel electrophoresis. The fragments of interest are identified by theoretically cloning of vector and/or insert with Geneious to get their fragment sizes and comparing them with a standard DNA ladder. The expected bands are visualized under UV light and isolated from the gel by using a scalpel (cleaned with EtOH before). Usually, the DNA is then extracted via a spin column extraction kit to remove the accompanying salts and stain. In our case, we used the QIAquick Gel extraction Kit (250) (QIAGEN, Germany) and the including protocol. The kit works on a silica-membrane basis and makes it possible to purify up to 400 mg slices of DNA bands from gels. After several fast binding and washing procedures the DNA is eluted with 30–50 μl elution buffer. Besides the PCR products, which were mostly eluted with 30 µl elution buffer, we usually used 20 µl of elution buffer. The purified DNA fragments are ready for direct use in all applications, including sequencing, ligation and transformation (QIAGEN, Hilden, Germany).
Verification of Correct BioBrick Part Assembly
After production of a new BioBrick vector, there are different possibilities to test the correct assembly of the used BioBrick parts before sending them for sequencing.
Test digestion
It is important to be aware of negative controls for the analysis of a test digestion. That means the vector backbone of the particular construct has to be digested with the same enzymes as the assembled BioBrick for comparing the expected bands. The required enzyme volume per sample can be reduced down to 0,5 µl of each enzyme. According to that, an incubation time of 40 min is enough and depending on the size of the expected fragments, the gel runs only about 25 min at 115 V.
Colony PCR
Another strategy is that a colony PCR can be performed by using primers that anneal to the verification primer binding sites. When designing these primers, it is important to make several predictions, for example to avoid undesirable pairings of the primers or unspecific bindings to the template. Therefore the primers are designed by choosing the same melting temperature (Tm) as the desired template. According to that they should have a primer length of about 800 bp for a good detection on the gel. With a colony PCR, bacterial colonies are screened directly by PCR. Each colony is picked with a sterile toothpick, which can be transferred not only into a PCR mix, but at the same time into fresh DYT media preparing for a Mini- or Midiprep. When using a standard polymerase, the PCR is started with an extended denaturation time of 95°C to release the DNA from the cells. After running the program, the samples are loaded on an agarose gel to proof the success of a BioBrick assembly.
Purification of Plasmid DNA
Miniprep
We used the QIAprep® Spin Miniprep Kit (QIAGEN, Germany) which enables the purification of up to 20 µg molecular biology grade plasmid DNA or cosmid DNA. The procedure was done following the QIAGEN standard protocol including three basic steps. First one is the clearing of the bacterial lysate, then the adsorption onto a membrane and at the end the elution of plasmid DNA. Before clearing the lysate, the bacteria are lysed under alkaline conditions (Buffer 1 with RNase, Buffer P2). Buffer P2 contains SDS, which solubilizes the phospholipid and protein components of the cell membrane, while NaOH denatures the plasmid DNAs and proteins. After that the lysate is subsequently neutralized (N3 Buffer) and exposed to high salt-binding conditions. This leads to precipitation of chromosomal DNA, cellular debris and SDS, while the smaller plasmid DNA renaturates and stays in the solution. As a next step the sample can be applied to the spin column following two washing steps with PB and PE Buffer. Finally, the DNA can be eluted with water or with elution buffer. Unlike the standard protocol, we eluted the DNA with 60 µl Buffer EB instead of using 50 µl. (QIAGEN, Hilden, Germany)
Midiprep
The Midipreps were done following the standard protocol of Qiagen using a QIAGEN® Plasmid Plus Midi Kit (QIAGEN, Hilden, Germany). These kits enable fast, large-scale purification of up to 250 μg of highly pure plasmid DNA (description of most used buffer under 3.1.12.1). By using a vacuum manifold which replaces the single centrifugation steps up to 24 samples can be prepared in parallel. Therefore we used the vacuum technique for large sample numbers of Midipreps as well as Minipreps. The plasmid DNA obtained is suitable for example to transfect the DNA into sensitive cell lines. (QIAGEN, Hilden, Germany)
Cell Culture
Cell Lines
HEK 293 Cells
Overview
The 293 cell line was derived from primary cultures of human embryonic kidney (HEK) cells with sheared fragments of adenovirus (Ad) 5 DNA (Graham et al. 1977). HEK 293 cells contain the nucleotides 1-4344 of Ad5 which are located within the pregnancy-specific ß-1-glycoprotein 4 (PSG 4) gene. The transforming region of the human adenovirus contains the early region (E1), comprising two transcription units, E1a and E1b, whose products are essential and sufficient for mammalian cell transformation by adenoviruses (Louis et al. 1997). Because 293 cells express E1 gene products they are extensively used for the production of E1-deleted Ad viruses. Adeno-associated viruses (AAVs) belong to the family of Parvoviridae, being one of the smallest single-stranded and non-enveloped DNA viruses. AAVss are replication-deficient and have required co-infection with a helper adeno- or herpes virus for productive infection.
The AAV Helper-free system takes advantage of the identification of the specific adenovirus gene products that mediate AAV replication and allows the production of infectious recombinant human adeno-asscociated virus-2 (AAV-2) virions without the use of a helper virus (AAV Helper-free System Instruction Manual, Agilent Technologies).
Stratagene recommends preparing Adeno-associated virus stocks using the AAV-293 cell line.The AAV-293 cells are derived from the commonly used HEK293 cell line, but produce higher viral titers. These cells also allow production of infectious viral particles when cells are co-transfected with the three AAV Helper-Free System plasmids (ITR containing plasmid, pAAV_RC and pHelper) because the adenovirus E1 gene product is stably expressed in AAV-293 cells.
Thus the AAV-293 cell line is specifically selected for high levels of AAV production in a Helper-Free System and offers several advantages over common HEK293 cells.
Establishing AAV-293 Cultures from Frozen Cells
For safe treatment of cells, the following steps have to be carried out under sterile conditions. Required materials and chemicals are: DMEM (Dulbecco`s Modified Eagle Medium 1x, Invitrogen, Darmstadt, Germany), PBS (Dulbecco`s PBS (1x) w/o Ca and Mg, PAA Laboratories GmbH, Pasching, Austria), T75 flask (Nunc, 75 cm2 nunclon treated flask, blue filter cap, Roskilde, Denmark), 15 ml falcon, pipett tips
- Thaw frozen cells within 1-2 minutes by gentle agitation in a 37 °C water bath
- Transfer the thawed cells suspension into the 15 ml falcon containing 10 ml of DMEM
- Collect cells by centrifugation at 200 x g for 5 minutes at room temperature (Centrifuge 5702, Eppendorf, Hamburg, Germany)
- Remove supernatant and resuspend the cells in 3 ml of fresh DMEM by gently pipetting up and down
- Transfer the 3 ml of cell suspension to a T75 flask containing 17 ml of DMEM
- Place the cells in a 37 °C incubator at 5 % CO2.
- Monitor cell density daily. Cells should be passaged when the culture reaches 50 % confluence.
Passaging of AAV-293 Cells
Required materials and chemicals: DMEM, PBS, Trypsin-EDTA 0,25 % (Invitrogen, Darmstadt, Germany), T75 flask, 15 ml falcon, pipett tips
- Prewarm the DMEM to 37 °C in a water bath and trypsin-EDTA solution at room temperature
- Remove the medium and wash cells once with 10ml of phosphate-buffer saline (PBS)
- Trypsinize the cells for 1-1.5 minutes in 1 ml of trypsin-EDTA solution
- Dilute the cells with 10 ml DMEM to inactivate the trypsin and detach the remaining cells by soft resuspending
- Transfer cells into a 15 ml falcon
- Collect cells by centrifugation at 200 g for 5 minutes
- Calculate the cell amount per ml via Neubauer cell chamber
- Mix 95 µl Tryptan Blue Stain 0,4 % (Lonza, Walkersville, USA) with 5 µl of the cell suspension
- Mix gently by pipetting up and down
- Pipet the solution into the Neubauer chamber
- Tryptan stains dead cells blue, living cells appear as white
- Counting of all living cells in four big squares
- Calculate the amount of living cells per ml with the help of following formula: (counted cells/ 4 ) * 2.2 * 20 * 10.000
- Calculate the cell amount per T75 flask (1.500.000 cells/20 ml DMEM) and transfer the cell suspension to a T75 flask containing fresh DMEM. Place the cells in a 37 °C incubator at 5 % CO2.
Transfecting the AAV-293 Cells
Stratagene recommends a calcium phosphate-based protocol, usually resulting in the production of titers ≥ 107 particles/ml when AAV-293 cells were transfected. To achieve high titers, it is important that AAV-293 cells are healthy and plated at optimal densitiy. It should be taken care to avoid clumping of the cells during passaging and plating for transfection. Required materials and chemicals: 0.3 M CaCl2, 2x HBS-Buffer pH 7.1, autoclaved deionized (Millipore) water, 1.5 ml Eppi-tubes
- Inspect the host cells that were split two days before; they should be approx. 70-80 % confluent
- Remove the plasmids to be co-transfected from storage at -20 °C. Adjust the concentration of each plasmid to 1 µg/µl in sterile/autoclaved Millipore water.
- Pipet the required volume of each of the plasmid DNA solution (5 µg of each plasmid) into an 1.5 ml tubes. Fill up to 300 µl with sterile Millipore water.
- Add 300 µl of 0.5 M CaCl2 and mix gently.
- Pipet 600 µl of 2x HBS into a 15 ml falcon.
- Vortex the falcon gently while pipetting the DNA/CaCl2 solution dropwise into the falcon.
- Incubate 20 minutes (precipitate formation).
- Apply the DNA/CaCl2/2x HBS solution dropwise to the plate of cells (10 cm dish).
- Return the cells in a 37 °C incubator at 5 % CO2 for 6 h.
- After incubation remove the medium, wash once with PBS and replace it with 10 ml of fresh DMEM growth medium.
- Return the cells back to the 37 °C incubator for an additional 66-72 h.
HT1080 Cells
A431
Overview
The A431 cells belong to the fibroblasts and the cell line was established from an epidermal carcinoma of a vulva. The main purpose of fibroblasts is to maintain the structure of connective tissues by continuously secreting precursors of the extracellular matrix. They are the most common cells in connective tissue in animals. The A431 cells show an epithelial morphology, have been used for a lot of different studies in cellbiology and are naturally devoid of a potent tumor suppressor and transcription factor: p53 protein (p53His273 mutation). The extreme expression of EGF receptors by this cell line is due, at least partly, to the amplification of EGF receptor DNA sequences (30-fold). Normal human cells exhibit a EGF receptor density ranging from 40.000 to 100.000 receptors/cell whereas the A431 cell line has 3x10⁶ receptors/cell. (Carpenter & Cohen 1979) (Shimizu et al. 1984) (Panksepp et al. 1984)
Flow Cytometry
Overview
Flow cytometry is a technique for measuring and analyzing multiple physical characteristics of single particles, usually cells, as they flow in a fluid stream through one or more beams of light. The properties measured include the particle`s relative size and granularity or internal complexity and relative fluorescence intensity.
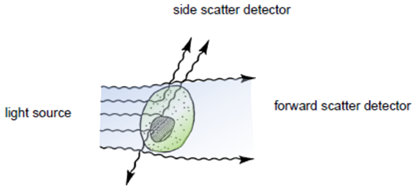
After hydrodynamic focusing (produces a single stream of cells) cells are carried to the laser intercept. When these cells pass through the laser intercept, they scatter laser light. Light that is scattered in the forward direction is collected by a lens known as the forward scatter channel (FSC). The FSC intensity nearly equates to the particle`s size and can be used to distinguish between cellular debris and living cells. Light measured perpendicular to the excitation line is called side scatter. The side scatter channel (SSC) provides information about cell complexity or granularity.
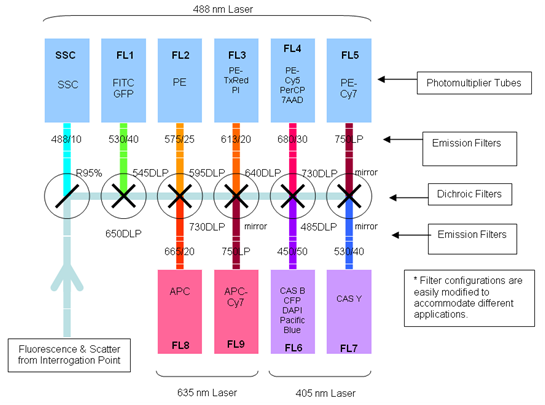
Fluorescent labeling allows investigation of cellular structure and functions. Flow cytometers use distinct fluorescence (FL-) channels to detect light emitted. The detection of fluorescent proteins in cells allows to monitor gene expression and to identify fluorescently labeled particles.
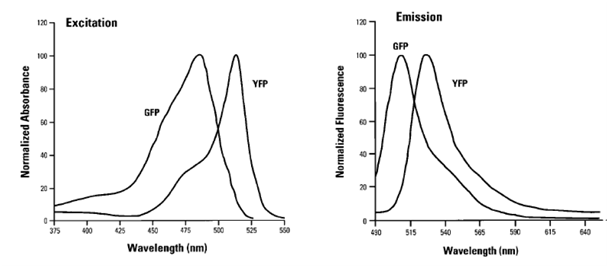
There are a lot of fluorescent substances with potential applications in flow cytometry. The most frequently used molecule is the green fluorescent protein (GFP), a biological molecule derived from the jellyfish Aequorea victoria. Among GFP variants, yellow fluorescent proteins (YFPs) are relatively acid-sensitive and uniquely quenched by chloride ions (Cl-). Found in the Registry of Standard Biological Parts, we used mVenus (BBa_I757008) as our desired gene of interest which contains a novel mutation at position F46L. SEYFP-F46L (Venus) folds well and forms the chromophore efficiently at 37°C (Nagai et al. 2002). The usage of fluorescent molecules as fusion proteins allows checking the transduction efficiency by determining the fluorescent intensity of YFP in transduced cells. GFP shows excitation and emission maxima at 489nm and 509nm, respectively. SEYFP-F46L`s peak excitation and emission wavelengths are 515nm and 528nm. Both GFP and SEYFP-F46L can be excited with a 488 nm blue laser and detected on FL 1.
The number of fluorescent proteins that can be detected depends on the instruments and lasers available to the user. The Flow Cytometer CyAn ADP 9 Color from Beckman Coulter (Krefeld, Germany) is equipped with a 488 nm and a 405 nm laser and a 642nm diode which allows the detection of fluorescence of different fluorochromes. We used the 488 nm laser to excite mVenus (YFP) and the fluorescent channel 1 (FL 1) to detect light emitted.
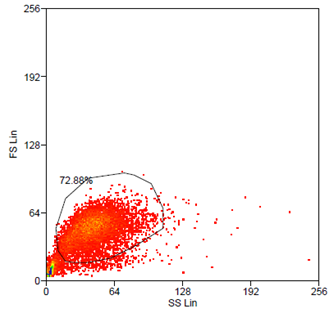
Data analysis was carried out using Summit 4.3 (Beckman Coulter) software. Forward and side scatter light gating were used to exclude dead cells and debris (Fig. 5). A minimum of 10.000 events was collected for each gate and histogram, respectively.
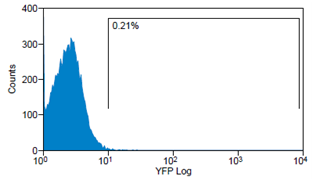
Analytical gates were set such that 1% or fewer of negative control cells fell within the positive region (Fig.6 left). The same gate was used to detect the YFP-Expression of transduced cells (Fig.6 right). For transduction we use human tumor cell lines (HT1080 and A431). YFP expression can be correlated with the transduction efficiency of the viral vectors by monitoring measured fluorescence.
Sample Preparation for Flow Cytometry
- Harvest cells by trypsinization with 0,25% 1x Trypsin-EDTA (Invitrogen, Darmstadt, Germany)
- Collect cells by centrifugation at 1200 x g for 3 minutes (Heraeus Sepatech, Varifuge 3.0 R, Thermo Scientific, Germany)
- Discard supernatant and wash cells by resuspending cell pellet with 500 µl 1x Dulbecco`s PBS without calcium, and magnesium (PAA, Pasching, Austria)
- Centrifuge at 1200 x g for 3 minutes
- Discard supernatant and resuspend cell pellet with 500 µl Dulbecco`s PBS
- Centrifuge at 1200 x g for 3 minutes
- Discard supernatant and resuspend cell pellet with 500 µl Dulbecco`s PBS
- Centrifuge at 1200 x g for 3 minutes
- Discard supernatant and resuspend cell pellet with 300 µl Dulbecco`s PBS for evaluation on flow cytometry
- Use the 488 nm blue laser to excite the fluorochrome YFP and FL-1 to detect light emitted.
Cell Staining for Flow Cytometry
- 7-AAD Viability Staining: 7-AAD has a high DNA binding constant and is efficiently excluded by intact cells. It is useful for DNA analysis and dead cell discrimination during flow cytometric analysis.
- For dead cell exclusion, wash cells threefold with 500 µl of 1x Dulbecco`s PBS
- Discard supernatant and resuspend cell pellet in 300 µl of Cell Staining Buffer (BioLegend, BIOZOL Diagnostica, Eching, Germany)
- Add 3 µl of 7-AAD and incubate for 5-10 minutes in the dark before analysis
- Alexa Flour 647 Annexin V: Annexin V is a member of the annexin family of intracellular proteins that binds to phosphatidylserine (PS) in a calcium-dependent manner. PS is normally only found on the intracellular leaflet of the plasma membrane in healthy cells, but during early apoptosis, membrane asymmetry is lost and PS translocates to the external leaflet. Fluorochrome-labeled Annexin V can then be used to specifically target and identify apoptotic cells.
- Wash cells twice with cold cell staining buffer (BioLegend, BIOZOL Diagnostica, Eching, Germany)
- Resuspend cell pellet in 100 µl Annexin V binding buffer (BioLegend, BIOZOL Diagnostica, Eching, Germany)
- Add 5 µl of Alexa Fluor 647 Annexin V (BioLegend, BIOZOL Diagnostica, Eching, Germany)
- Add 10 µl of PI solution (BioLegend, BIOZOL Diagnostica, Eching, Germany) or 7-AAD (for double-staining)
- Gently vortex the cells and incubate for 15 min at RT in the dark
- Add 400 µl of Annexin V Binding Buffer (BioLegend, BIOZOL Diagnostica, Eching, Germany) and analyze the samples by flow cytometry
MTT Assay
Overview
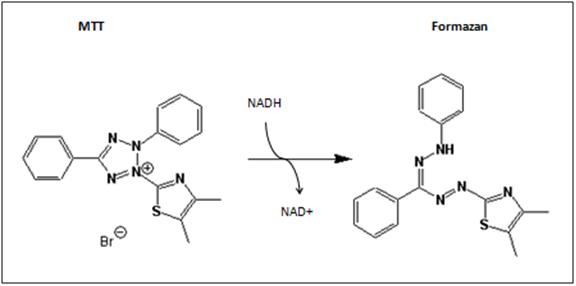
The MTT-assay is a colorimetric assay, which is able to detect cell proliferation, viability and cytotoxity. It is based on the metabolic activity of viable cells. MTT (3-(4,5-Dimethylthiazol-2-yl)-2,5diphenyltetrazolium bromide) is a yellow tetrazole, which is reduced to purple formazan in the presence of NADH and NADPH.
Viable, metabolic active cells produce in the respiratory chain the pyridine nucleotide cofactors (NADH, NADPH). NADH and NADPH are basically responsible for cellular reductions and therefore responsible for the cleavage of MTT. (Roche n.d.) Our purpose is to use the MTT-assay as a cytotoxity test, for testing cytotoxity on the tumor cell lines HT1080 and A431. The MTT-Assay can easily be performed in 96-well plates. This enables a reduction of the amount of culture medium, cells and plasticware. Furthermore, the dye MTT is a bargain. On balance, it is a cheap and simple method to detect viability. The colorimetric analysis can simply be carried out via spectrometry. In our case, we are using the ELISA-Reader Tecan Sunrise for reading out our 96-well plates. In comparison to other viability assays, the product formazan of the MTT-assay unfortunately is water insoluble. That’s why an additionally step to solve the formazan has to be performed.
Protocol
Sörensen-buffer: 0.1 M Glycine, 0,1 M NaCl, H2O, pH 10.5 MTT-Solution: 3.65 mg/ml in PBS, The solution should be kept cold (4°C) and in the dark (Schröter 2009)
- Day one:
- Take the T75 Flask, remove Medium, wash the cells with 8 ml PBS detach cells with 1ml Trypsin (about 30 seconds up to 10 minutes incubation time! Check permantly!). Inactivate Trypsin with 10 ml DMEM medium, transfer the cells into a 15 ml falcon. Centrifugate (200 rcf/g for 5 min).
- Remove supernatant, resuspend pellet with 10 ml DMEM. Count cells via Neubauer Cell Chamber.
- Take the 96 well plates and add 5.000-10.000 cells in each well. Fill up to 200µl with DMEM.
- Leave some wells empty for negative control
- Put the plate into the incubator. Incubate over night, to allow cells to attach to the wells
- Day two:
- Remove medium (carefully!)
- Treat cells with the drug
- Final volume should be 200 µl per well
- Incubate 1-3 days
- Day three:
- Remove medium (carefully!)
- Fill in 100 µl medium and 25µl MTT solution
- Incubate 4 hours
- Remove medium
- Resuspend in 200µl DMSO and 25 µl Sörensen-buffer
- (take on shaker for 15 minutes) read absorbance at 570 nm
Quantitative real-time PCR
The quantitative real-time polymerase chain reaction (qPCR) represents a beneficial method for monitoring the amplification of a specific DNA sequence. The amount of PCR product is measured after each cycle. By comparing the exponential phase of the samples with a standard curve of known sequence copies, the exact initial DNA-amount can be determined. This method not only provides the possibility of precise quantification but also renders analysis of the products after PCR redundant. For measuring the sequence copy number one takes advantage of a fluorescent dye that incorporates into double-stranded DNA. The template amplification results in increasing fluorescence signals which can be directly correlated to the amplicons. By illustrating the fluorescence against the cycle number by a diagram, quantification of PCR product can be illustrated over time (Nolan et al. 2006; Invitrogen 2008).
SYBR Green
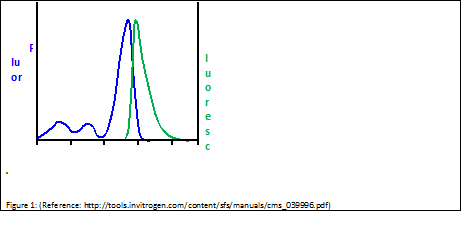
SYBR Green is a nucleic acid stain which preferentially binds within the minor groove of double-stranded DNA. By excitation at λmax = 488 nm, fluorescence emission can be detected at λmax = 525 nm. As binding to double-stranded DNA increases fluorescence emission, amplification of DNA can be monitored and correlated to the amount of double-stranded DNA in the original sample.
Protocols
We used quantitative real-time PCR to determine genomic virus titers after the transfection of our production cells and after the transduction of our various tumor cell lines with the harvested virus particles. We followed protocols published by Rohr et al. (Rohr et al. 2002), (Rohr et al. 2005).
Genomic titer
To measure the titer of assembled virus particles in our harvested production cells, we first digested all cellular and plasmid DNA left in our virus stocks. We therefore treated 5 µl supernatant from pelleted cell lysate with 7.5 µl DNase I (Fermentas, Catalogue No. EN0521, 1 u/µl) and 5 µl 50 mM MgCl2 (end concentration 5 mM) in a final volume of 50 µl at 37°C for 30 min. We then heat inactivated the enzyme for 10 min at 65°C. PCR reactions were carried out with 2 µl of our digested samples.
Infectious titer
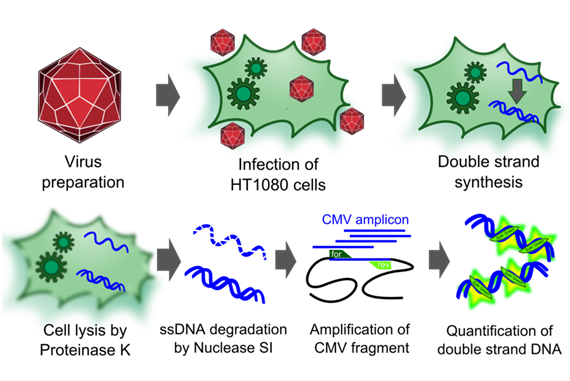
To measure the titer of infectious virus particles, we digested our transduced cells with 10µg Proteinase K (Sigma Aldrich) for 1 h at 50°C. After inactivation at 97°C for 15 minutes, we centrifuged the lysate at 13.000 g for 10 minutes and digested 10 µl of the supernatant with 5µl S1 nuclease (Promega, 100 u/µl) for 30 minutes at 37°C. The enzyme was again inactivated for 15 minutes at 97°C. DNA was diluted 1:100. PCR reactions were carried out with 5 µl of our digested samples.
All qPCR reactions were carried out using the QuantiFast SYBR Green PCR Kit from Quiagen, (Catalouge No. 204052), employing the following primers:
- CMV_forward_qPCR: 5' - GGGACTTTCCTACTTGGCA - 3'
- CMV_reverse_qPCR: 5' - GGCGGAGTTGTTACGACA - 3'
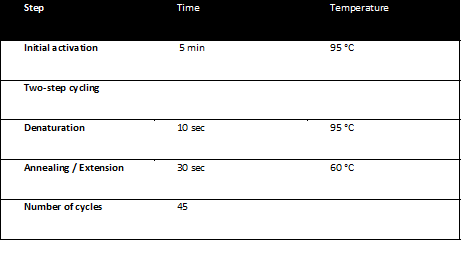
The qPCR reactions were run on a Corbett RotorGene 3000 realtime thermal cycler and analyzed with the RotorGene software. The qPCR program was:
Protocols; Standard Operating Procedures
Standard Protocol: Cloning
Media:Freiburg10_Advanced_Cloning_Protocol_04_08_2010.pdf
Media:Split_cellculture.pdf
Media:Freeze_cellculture.pdf
Media:production of competent E.coli.pdf
Media:Freiburg10_Transfection_protocoll.pdf
Media:Freiburg10 Thawing cells.pdf
Media:Freiburg10_Aminoacids_vs_restrictionsites.pdf
Media:Freiburg10 Endotoxinfreie Midi.pdf
Media:Freiburg10_LB+Agar.pdf
Media:Freiburg10_Subcloning_cap_into_pAAV_RC.pdf
Media:Freiburg10_Quantitative_realtime_PCR_for_Titering_of_infectious_AAV_particles.pdf
 "
"


