Team:Tsinghua/project/outline
From 2010.igem.org
(→Donor Plasmid(DP) Construction) |
(→Strategy) |
||
| Line 83: | Line 83: | ||
For constructing donor plasmid C, we first cut the GFP and mCherry to 2 fragments respectively. Then we insert these four fragments into the plasmid in the order shown in the above picture. We expect that we can see either green or red fluorescence after transforming and inducing. Through this experiment, we can tell whether or not recombination sequence will affect the normal function of genes, further demonstrate that antibody producing by our system will be effective. On the other hand, we should note that the sequence length is another significant reason of antibody diversity, so the effect of recombination sequence on antibody will much small than that on fluorescence genes. | For constructing donor plasmid C, we first cut the GFP and mCherry to 2 fragments respectively. Then we insert these four fragments into the plasmid in the order shown in the above picture. We expect that we can see either green or red fluorescence after transforming and inducing. Through this experiment, we can tell whether or not recombination sequence will affect the normal function of genes, further demonstrate that antibody producing by our system will be effective. On the other hand, we should note that the sequence length is another significant reason of antibody diversity, so the effect of recombination sequence on antibody will much small than that on fluorescence genes. | ||
| - | ==== | + | ====Strategies==== |
Traditionally, we can construct these three plasmids by inserting genes into the plasmid one by one. However, considering the huge number of antibody fragments, we try our best to seek other strategies to complete the ligation of multiple fragments, which can be done more quickly and efficiently. | Traditionally, we can construct these three plasmids by inserting genes into the plasmid one by one. However, considering the huge number of antibody fragments, we try our best to seek other strategies to complete the ligation of multiple fragments, which can be done more quickly and efficiently. | ||
Revision as of 14:44, 16 October 2010

Outline
Module I
Abstract
Flow chart
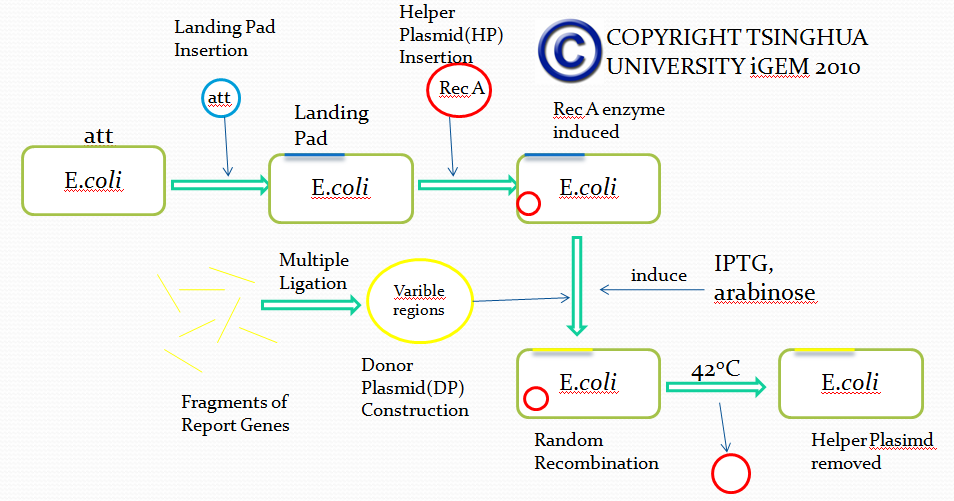
Landing Pad Insertion
Purpose of this step
Landing pad insertion is the first step of our two-step recombination system.
We insert a “landing pad” fragment which includes a promoter (placIQ1) and a tetracycline resistance gene (tetA) flanked by I-SceI recognition sites and 20-bp landing pad regions (LP1 and LP2) into Escherichia coli chromosome via att recombination. Then the helper plasmids encoding I-SceI endonuclease and λ-Red and donor plasmid encoding various antibiotic genes flanked by I-SceI recognition sites and same landing pad regions (LP1 and LP2) are transformed, which will be introduced in detail in next part. I-SceI expression is induced via the addition of L-arabinose. I-SceI recognition sites in the donor plasmid and chromosome are cleaved. Integration of the fragment in donor plasmid is facilitated by IPTG-induced λ-Red expression.
This two-step recombination method allows for the insertion of very large fragments into a specific location in Escherichia coli chromosome and in any orientation.
Construction of landing pad
Landing pad consists of the following parts: a promoter (placIQ1), two landing pad regions, two I-SceI recognition sites and a tetracycline resistance gene (tetA).
First we obtain two target DNAs – promoter and tetA with PCR. Then We use the overlap extension polymerase chain reaction (or OE-PCR) to link two fragments together. Primer 2 and primer 3 have homologous sequences, so one segment can anneal to the other in certain conditions, in other words, the two segments can overlap into one segment after extension. If necessary, operate PCR again with primer 1 and primer 4 to obtain more products.
ATT RECOMBINATION
Our approach is based on genome targeting systems that utilize plasmids carrying a conditional-replication origin and a phage attachment (attP) site (17). We refer to our plasmids as CRIM (conditionalreplication, integration, and modular) plasmids. CRIM plasmids can be integrated into or retrieved from their bacterial attachment (attB) site by supplying phage integrase (Int) without or with excisionase (Xis) in trans.
We got a strain with plasmid pUK2 from LAB. Than we develop a E.coli strain contains the helper plasmid AH69. These two plasmids are shown below. In order to match other parts of our whole project, the modification that kan-exon should be replaced with tet-SDS was necessary. We got tet-SDS from another plasmid named pkts-cs. Then we use PCR to get the two fragments as PT (from pkts-cs) and V (from pUK2). We ligate PT and V after digestion and modification to form a new plasmid. This new plasmid was named as pUKIP and contains a promoter region, a tet-SDS region and phage attachment site (attP). As reported in the paper, there exist one bacterial attachment site (attB) of HK002 in TorT-TorS gene of the chromosomal DNAs of E.coli K12 strain. That is to say, the PT fragment will integrate into the cell genome after the plasmid was transferred in cells.
Helper Plasmid(HP) Insertion
CRIM plasmid integration
Cells carrying a CRIM helper plasmid were grown in 20 ml of LB cultures with ampicillin at 30°C to an optical density of 600 nm of ca. 0.6 and then made electrocompetent. Following electroporation, cells were suspended in LB without ampicillin, incubated at 30°C for 30 min, at 42°C for 30 min and at 30°C for 30 min, and then spread onto selective agar (tet) and incubated at 37°C. Colonies were purified once nonselectively and then tested for antibiotic resistance for stable integration and loss of the helper plasmid and by PCR for copy number.
CRIM plasmid excision
Cells were transformed with the respective Xis/Int CRIM helper plasmid and then spread on ampicillin agar media at 30°C. Colonies were purified once or twice nonselectively on plates that were incubated for 1 h at 42°C and overnight at 37°C. They were then tested for antibiotic sensitivities and by PCR for loss of the integrated plasmid.
Donor Plasmid(DP) Construction
Purpose of this step:
After inserting landing pad and helper plasmid to E.coli, we must construct a series of donor plasmids to demonstrate that this system can truly realize the recombinant process in E.coli, thus we can further use this module to simulate the recombination of antibody gene in mammalian B cells. We not only need to test the efficiency of recombination, but also ensure that genes we get from this recombinant process can be expressed correctly and have their original function. So we intend to construct three plasmids to test the system.
Experiment design and expected results:
[1] Donor plasmid A
In donor plasmid A, we insert two genes, kanamycin resistant gene (Kanr) and Chloromycetin resistant gene (Chlr). At the 5’ end of these two genes, we add I-scel recognizing sequence (which is represented by the white arrow) and recombination sequence 1 (which is shown in red). At the 3’ end, we add another recombination sequence (which is shown in blue) and also I-scel recognizing sequence. After construction, we will transform this donor plasmid to E.coli with landing pad and helper plasmid. After arabinose and IPTG inducing, the restriction enzyme I-scel will cut down these two genes (containing recombination sequences), which can recombine with the bacterial chromosome. In our expectation, either kanr or chlr will replace the landing pad, resulting in the bacteria resistance to either kanamycin or chloromycetin, but not both. This process will be random, so we can get as many colonies resistant to kanamycin as those resistant to chloromycetin.
[2] Donor plasmid B
Donor plasmid B includes four genes, GFP, mCherry, Kanr, Chlr, respectively. The same with genes in donor plasmid A, we add recombination sequences and I-scel recognition sequences to the ends of each genes. The recombination sequences of GFP and mCherry are identical, and those of Kanr and Chlr are the same. Note that recombination sequence at 3’ end of GFP (mCherry) and that at 5’ end of Kanr (Chlr) are the same, so we can get a random recombination of two genes, one is a fluorescence gene and the other is resistant gene, creating 2X2=4 different results.
[3] Donor plasmid C
For constructing donor plasmid C, we first cut the GFP and mCherry to 2 fragments respectively. Then we insert these four fragments into the plasmid in the order shown in the above picture. We expect that we can see either green or red fluorescence after transforming and inducing. Through this experiment, we can tell whether or not recombination sequence will affect the normal function of genes, further demonstrate that antibody producing by our system will be effective. On the other hand, we should note that the sequence length is another significant reason of antibody diversity, so the effect of recombination sequence on antibody will much small than that on fluorescence genes.
Strategies
Traditionally, we can construct these three plasmids by inserting genes into the plasmid one by one. However, considering the huge number of antibody fragments, we try our best to seek other strategies to complete the ligation of multiple fragments, which can be done more quickly and efficiently.
Principle
The fragments include different landing pad regions and endoclease recognition site, and are grouped together by sharing the same landing pad region.
Method
In the demand of larger amount of fragments and constructed plasmids, we find two ways to realize such purpose, regarded as the key point of our whole project-guarantee the large variation of antibody.
Donor Plasmid(DP) Insertion & Recombination Induction
Removal of Helper Plasmid(HP)
Module II
Strategy 1
Strategy 2
Strategy 3
Cooperation with Macquarie Australia
 "
"


