Team:Alberta/Achievements/Overview
From 2010.igem.org
(→Transformation of E. coli with a Constructed Plasmid) |
Rpgguardian (Talk | contribs) |
||
| (11 intermediate revisions not shown) | |||
| Line 16: | Line 16: | ||
<div id="horiz-line"></div> | <div id="horiz-line"></div> | ||
<p> | <p> | ||
| - | The first major accomplishment of our project was | + | The first major accomplishment of our project was the design and optimization of the [[Team:Alberta/biobyte2|BioBytes 2.0]] standard for parts. Using the BioByte 2.0 system as a standard for our parts we created an assembly method that allows the construction of useful transformable constructs from BioBytes. This was done very early on, but was essential for the progression and success of the remainder of the project. |
</p> | </p> | ||
| Line 36: | Line 36: | ||
<p> | <p> | ||
It can be observed that the the major product of both the octamer and tetramer constructs was the complete construct. This was an exciting gel, as the octamer was constructed in under 3 hours - a feat that would have taken more than an entire summer using the BioBrick method. | It can be observed that the the major product of both the octamer and tetramer constructs was the complete construct. This was an exciting gel, as the octamer was constructed in under 3 hours - a feat that would have taken more than an entire summer using the BioBrick method. | ||
| + | </p><p> | ||
| + | With our octamer in hand we pushed forward to create plasmids using the BioBytes 2.0 assembly method to create functional plasmids to transform into ''E. coli'' | ||
</p> | </p> | ||
| Line 43: | Line 45: | ||
<div id="horiz-line"></div> | <div id="horiz-line"></div> | ||
<p> | <p> | ||
| - | The octamer demonstrated that we could create long constructs out of pieces of DNA, so the next step was to construct a fully functional plasmid and test drive it in a cell. To do this, we started with a short construct that contained all the required parts of a plasmid. This also allowed us to test out the parts we had made specifically for this purpose. | + | The octamer demonstrated that we could create long constructs out of pieces of DNA, so the next step was to construct a fully functional plasmid and test drive it in a cell. [[Image:Alberta Tformplasmid.jpg|right|250px]] To do this, we started with a short construct that contained all the required parts of a plasmid: an Ori, a selectable marker, and RFP so complete assemblies could be easily screened for. This also allowed us to test out the parts we had made specifically for this purpose and test BioBytes 2.0 in a more applicable environment. |
</p> | </p> | ||
| - | + | ||
<p> | <p> | ||
| - | This plasmid is seen on the right and contains everything needed to function in vivo. | + | This plasmid is seen on the right and contains everything needed to function in vivo. It was constructed on an iron micro bead starting from the anchor and was finished with the cap. |
</p> | </p> | ||
| - | [[Image:Alberta_Rfpkan.jpg|left|250px|thumb| | + | [[Image:Alberta_Rfpkan.jpg|left|250px|thumb|This shows the cells that were transformed using constructs created using BIoBytes 2.0 fluorescing red and a negative control.]] |
| + | As we can see in the figure on the left the transformations were successful. This was a huge step for our team as it shows unambiguously that BioBytes 2.0 can create working plasmids that can be transformed into ''E. coli''. | ||
| + | |||
<div style="clear:both"></div> | <div style="clear:both"></div> | ||
| - | ==High School Student | + | ==High School Student Assemblies== |
<div id="horiz-line"></div> | <div id="horiz-line"></div> | ||
<p> | <p> | ||
| - | Once we had transformed <em>''E. coli''</em> with constructs we made using BioBytes 2.0, we wanted to test the educational value of the project. To do this, we | + | Once we had transformed <em>''E. coli''</em> with constructs we made using BioBytes 2.0, we wanted to test the educational value of the project. To do this, we completed the same experiment with five high school students using precision droppers. [[Image:Studentplate.jpg|right|280px|thumb|Cells transformed with plasmids created by high school students]] Each group of students ended up with red fluorescent colonies on their plates. Using the BioBytes 2.0 assembly method, high school students are able, with limited technology, to successfully construct their own plasmids. A more in depth look what was done with the high school students can be found on our [[Team:Alberta/human_practices/HighSchool|High School]] page. |
| - | + | ||
</p> | </p> | ||
{{Team:Alberta/endMainContent}} | {{Team:Alberta/endMainContent}} | ||
Latest revision as of 03:15, 28 October 2010
BioBytes 2.0
The first major accomplishment of our project was the design and optimization of the BioBytes 2.0 standard for parts. Using the BioByte 2.0 system as a standard for our parts we created an assembly method that allows the construction of useful transformable constructs from BioBytes. This was done very early on, but was essential for the progression and success of the remainder of the project.
DNA Attachment
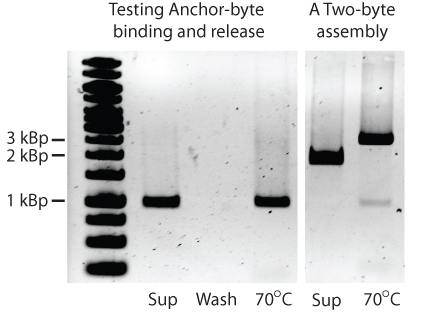
The next major step in the development of GENOMIKON was to successfully attach the BioBytes 2.0 anchor to poly-T iron micro beads. This was demonstrated by attaching a 1kbp anchor-AB KanR to the iron micro beads, then eluting it off of the beads.
As we can see, all of the 1kbp anchor-AB KanR is removed in the initial elution and none remains attached to the beads in the subsequent wash step. This is also true of the two BioBytes 2.0 construct seen on the right that is a 2kbp piece added to a 1kbp piece.
Octamer Construction
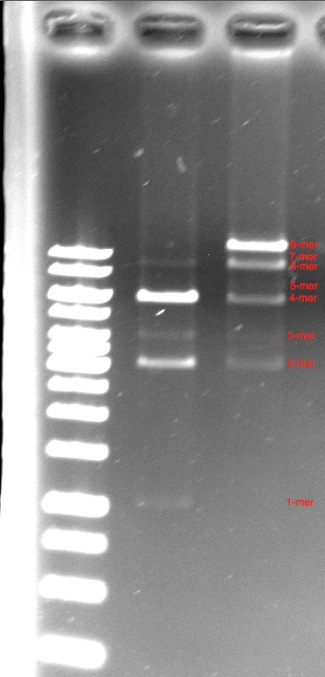
Our next major accomplishment was the assembly of a 12kbp construct made of 8 pieces of DNA using the BioBytes 2.0 assembly method. The octamer was assembled on an iron micro bead, starting with the anchor, and adding alternating 1kbp pieces and 2kbp pieces until the full 12kbp construct was achieved. This is seen in the third lane. A tetramer of the same construction is seen in the second lane.
It can be observed that the the major product of both the octamer and tetramer constructs was the complete construct. This was an exciting gel, as the octamer was constructed in under 3 hours - a feat that would have taken more than an entire summer using the BioBrick method.
With our octamer in hand we pushed forward to create plasmids using the BioBytes 2.0 assembly method to create functional plasmids to transform into E. coli
Transformation of E. coli with a Constructed Plasmid
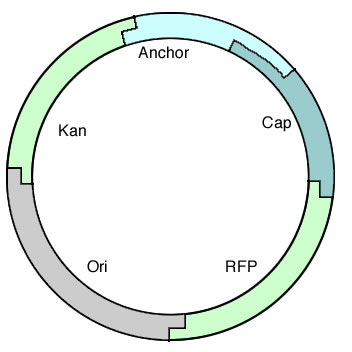
The octamer demonstrated that we could create long constructs out of pieces of DNA, so the next step was to construct a fully functional plasmid and test drive it in a cell.
To do this, we started with a short construct that contained all the required parts of a plasmid: an Ori, a selectable marker, and RFP so complete assemblies could be easily screened for. This also allowed us to test out the parts we had made specifically for this purpose and test BioBytes 2.0 in a more applicable environment.This plasmid is seen on the right and contains everything needed to function in vivo. It was constructed on an iron micro bead starting from the anchor and was finished with the cap.
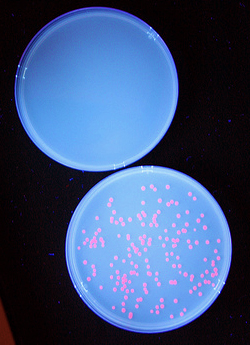
As we can see in the figure on the left the transformations were successful. This was a huge step for our team as it shows unambiguously that BioBytes 2.0 can create working plasmids that can be transformed into E. coli.
High School Student Assemblies
Once we had transformed E. coli with constructs we made using BioBytes 2.0, we wanted to test the educational value of the project. To do this, we completed the same experiment with five high school students using precision droppers.
Each group of students ended up with red fluorescent colonies on their plates. Using the BioBytes 2.0 assembly method, high school students are able, with limited technology, to successfully construct their own plasmids. A more in depth look what was done with the high school students can be found on our High School page. "
"


