Team:Alberta/biobyte2
From 2010.igem.org
| Line 74: | Line 74: | ||
[[Image:team-alberta-biobyteprocess-tour.jpg|center|frame|The entire construction process can be completed in an afternoon.]] | [[Image:team-alberta-biobyteprocess-tour.jpg|center|frame|The entire construction process can be completed in an afternoon.]] | ||
| - | + | BioBytes 2.0 Assembly Protocol | |
| - | |||
| - | + | ===Please note that the GENOMIKON kit comes with premade anchor-Byte constructs.=== | |
| + | ===All BioBytes are stored in TE buffer.=== | ||
| + | :# Mix the iron micro beads for 10 minutes. | ||
| + | :# Transfer a 25 ul (one drop) aliquot of iron micro beads to a 1.5 mL tube using a plastic micropipette supplied. | ||
| + | :# Pull the beads to the side using the magnetic tube rack supplied. | ||
| + | :# Remove and discard the supernatant. | ||
| + | :# Add 50 ul (2 drops) of supplied Wash Buffer to the beads. Flick gently to resuspend. | ||
| + | :# Pull the beads to the side using the magnetic tube rack. | ||
| + | :# Remove and discard the supernatant. | ||
| + | :# Repeat steps 5 to 7. | ||
| + | :# Add 200 ng of a premade anchor-Byte construct to the beads and top off the volume to 25ul with the TE Buffer supplied. Flick gently to resuspend. | ||
| + | :# Allow annealing for 30 minutes, mixing by flicking every 5 minutes. Ensure that there are no droplets on the sides of the tube. | ||
| + | :# Repeat steps 6 and 7. | ||
| + | :# Repeat steps 5 to 7. | ||
| + | :# Add 200 ng of the next Byte of your construct, making sure that a BA Byte follows an AB Byte and vice versa. Add an appropriate amount of 2x QuickLigase Buffer, Quick Ligase and TE to a total volume of 25ul. | ||
| + | Example: | ||
| + | {|style="center" | ||
| + | ! Reagent !! Volume (ul) | ||
| + | |- | ||
| + | | (40ng/ul) AB kan Byte || 5 | ||
| + | |- | ||
| + | | 2X Quick Ligase Buffer || 13 | ||
| + | |- | ||
| + | | TE Buffer || 6 | ||
| + | |- | ||
| + | | Quick Ligase || 1 | ||
| + | |- | ||
| + | | TOTAL || 25 | ||
| + | |} | ||
| + | |||
| + | |||
| + | :# Flick gently to resuspend. Allow ligation for five minutes, flicking gently every minute. | ||
| + | :# Add 25 ul of Wash Buffer to the tube. Flick gently. | ||
| + | :# Repeats steps 6 and 7. | ||
| + | :# Repeat steps 5 to 7 twice. | ||
| + | :# Repeat steps 13 to 17 for each subsequent Byte addition, including the last Byte. If the last Byte is cap, it must be added in 20 X molar excess. | ||
| + | :# After the last Byte has been ligated and washed, addition of 25 ul of 75C Elution Buffer. The entire tube should be kept at 75C for ten minutes to allow the DNA construct to elute off the beads. | ||
| + | :# After ten minutes, put the tube into a magnetic rack in the 75C waterbath. Allow the beads to be pulled aside and collect the supernatant into a clean 1.5 mL tube. The supernatant will contain your construct. | ||
| - | |||
| - | |||
| - | |||
| - | |||
| - | |||
Using this process we were able to assemble eight pieces in an afternoon! | Using this process we were able to assemble eight pieces in an afternoon! | ||
Revision as of 00:07, 28 October 2010
Overview
BioBytes 2.0 is the heart of the GENOMIKON kit. BioBytes 2.0 is a method of creating novel plasmids through the sequential addition of functional units of DNA. It is designed to be used in a high school setting but has potential to be used in professional settings as well. The assembly method we have created has some conceptual similarities to the original BioBytes Assembly System developed from the 2009 Alberta iGEM project. However, there are some striking differences between the two systems.
Traditional Methods
The current assembly standard is the BioBrick method. While the registry of parts and the assembly standard has allowed for effective construction of plasmids in a laboratory setting, it has numerous limitations prohibiting its use in high schools. For example, common laboratory protocols such as transformation, ligation, and restriction digestion require materials and equipment not available to high schools. Not only does this require expensive reagents and equipment, it also takes days to weeks to assemble a complicated construct. An experiment of such length far surpasses the average high school student’s attention span and the time a curriculum can spend on a particular subject.
Comparison
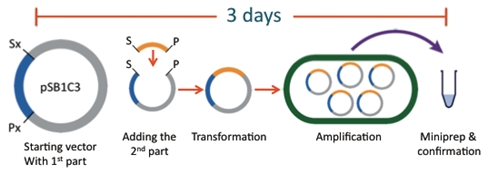
The BioBytes Assembly System 2.0 has provided a solution to these issues. The GENOMIKON kit is fast allowing for assembly of a novel plasmid in an afternoon rather than over the course of several days. The kit is completely self-contained, requiring no other equipment or reagents that does not come with the kit. This eliminates the need for the expensive equipment and reagents common place in a University laboratory setting. The addition of one part to a construct takes under 10 minutes. So creating a plasmid of your desired specifications can happen in an afternoon, rather than the 3 or more days to create a plasmid through the traditional BioBrick methods.
Components of the System
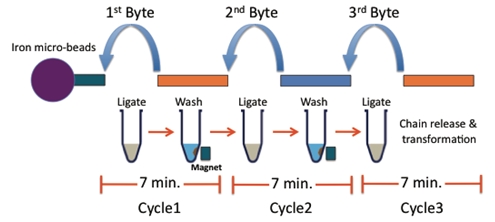
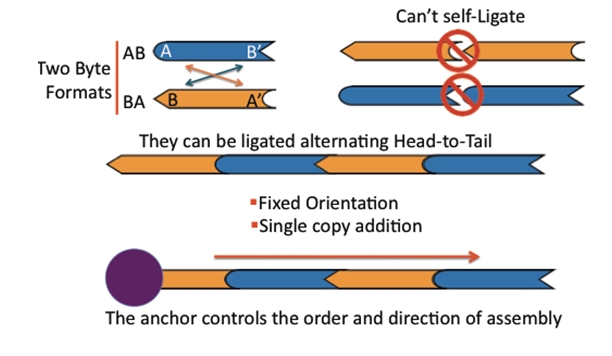
The Assembly Method 2.0 is composed of three main components. An anchor byte attached to an iron micro bead is the beginning of a construct. Because of the magnetic nature of these beads, they can be positioned by using a simple magnet. The BioBytes are added to the anchor-byte one at a time in sequence. This is possible due to the alternating overhang structure of the BioBytes. Finally, a cap is added allowing for circularization of the construct. The construct is now ready to transform.
Anchor Byte
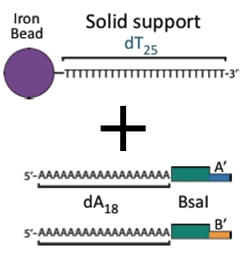
The Anchor-byte begins the process of assembly. It is composed of:
- a poly-A tail
- a BsaI recognition site
- an A or B overhang
Iron micro beads purchased from New England Biolabs have covalently attached poly-T tails. The bead allows us to manipulate the DNA with magnets making washing and subsequent attachments easier.
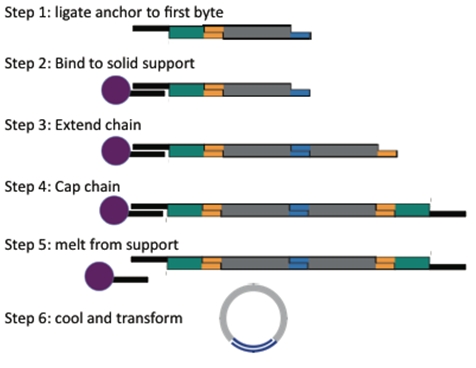
We have designed an anchor byte which begins the process of assembly. The anchor-byte is comprised of an Anchor piece ligated to the first byte of the assembly. Construction begins by ligating a selectable marker to the anchor. This first step allows for complete constructs to be selected for. As well, the incorporation of a BsaI cut site into the Anchor, before the first byte, gives versatility to the construct because the first byte and the rest of the construct can be removed from the anchor, and used as a Byte in and of itself.
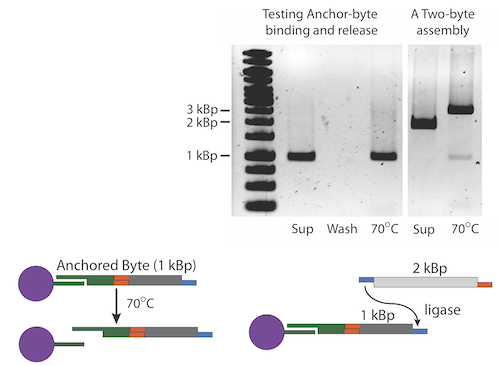
Once the selectable marker is ligated to the first byte, we anneal the anchor-byte to the poly-T tails on the iron micro bead. We have created anchors with both varieties of ends so that assemblies can begin with any type of byte. The results of one of our experiments is shown here. Note that the interaction between the anchor and the bead is non-covalent. The anchor along with the construct can be separated from the bead with heat. The gel shows the process of anchoring a construct. A anchor-byte construct of 1kb is allowed to anneal to the magnetic beads. This is done in excess, and the supernatant is shown in the first lane. A subsequent wash step showed the absence of DNA, indicating that DNA construct is stably bound. The construct can be melted from the scaffold at 70 degrees Celsius. The melted construct can be seen in the last lane.
The BsaI cut site found in the anchor allows for constructs to be created in parallel and then utilized as large Bytes in the assembly in the same way.
BioBytes 2.0
This year's BioByte design has a number of unique features. Each Byte has 4 base 5' overhangs on each side. These overhangs have be engineered to serve a number of purposes. The overhangs allow for ordered and sequential addition of parts to growing assemblies.
The addition of each byte to a growing assembly takes about 7 minutes.
Cap
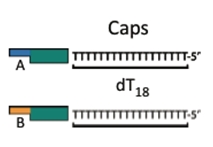
The cap is analogous to the anchor. The cap finishes the construct, where the anchor starts a construct. The cap is comprised of a poly-T tail, complimentary to the poly-A tail of the anchor piece. The cap also contains a BsaI cut site which allows it's removal from the construct. The cap also comes in both applicable flavors with an A or B overhang.
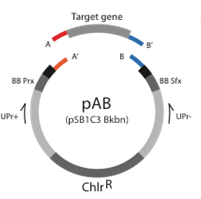
When finishing a construct, the cap is added and ligated to the growing construct, in the same manner as another byte. The completed construct is then heated, to melt the anchor piece from the iron micro bead. The solution is removed from the beads and allowed to cool. The cap and anchor then have opportunity to anneal to each other. The construct is now ready for transformation without ligation.
The Assembly Process
BioBytes 2.0 Assembly Protocol
Please note that the GENOMIKON kit comes with premade anchor-Byte constructs.
All BioBytes are stored in TE buffer.
- Mix the iron micro beads for 10 minutes.
- Transfer a 25 ul (one drop) aliquot of iron micro beads to a 1.5 mL tube using a plastic micropipette supplied.
- Pull the beads to the side using the magnetic tube rack supplied.
- Remove and discard the supernatant.
- Add 50 ul (2 drops) of supplied Wash Buffer to the beads. Flick gently to resuspend.
- Pull the beads to the side using the magnetic tube rack.
- Remove and discard the supernatant.
- Repeat steps 5 to 7.
- Add 200 ng of a premade anchor-Byte construct to the beads and top off the volume to 25ul with the TE Buffer supplied. Flick gently to resuspend.
- Allow annealing for 30 minutes, mixing by flicking every 5 minutes. Ensure that there are no droplets on the sides of the tube.
- Repeat steps 6 and 7.
- Repeat steps 5 to 7.
- Add 200 ng of the next Byte of your construct, making sure that a BA Byte follows an AB Byte and vice versa. Add an appropriate amount of 2x QuickLigase Buffer, Quick Ligase and TE to a total volume of 25ul.
Example:
| Reagent | Volume (ul) |
|---|---|
| (40ng/ul) AB kan Byte | 5 |
| 2X Quick Ligase Buffer | 13 |
| TE Buffer | 6 |
| Quick Ligase | 1 |
| TOTAL | 25 |
- Flick gently to resuspend. Allow ligation for five minutes, flicking gently every minute.
- Add 25 ul of Wash Buffer to the tube. Flick gently.
- Repeats steps 6 and 7.
- Repeat steps 5 to 7 twice.
- Repeat steps 13 to 17 for each subsequent Byte addition, including the last Byte. If the last Byte is cap, it must be added in 20 X molar excess.
- After the last Byte has been ligated and washed, addition of 25 ul of 75C Elution Buffer. The entire tube should be kept at 75C for ten minutes to allow the DNA construct to elute off the beads.
- After ten minutes, put the tube into a magnetic rack in the 75C waterbath. Allow the beads to be pulled aside and collect the supernatant into a clean 1.5 mL tube. The supernatant will contain your construct.
Using this process we were able to assemble eight pieces in an afternoon!
Byte Design
Because the overhangs in this year's project are only 4 bases long, and because the ends are malleable, we engineered the overhangs in our bytes give additional versatility. In this classification system, AB parts are "ORF" parts. The "ORF" parts contain the coding sequence of genes. However, these "ORF" parts do not contain a complete open reading frame. They lack a promoter, a RBS, a start codon, a stop codon and a terminator. Therefore, an "ORF" part by itself has no function at all. We have coined this type of parts "naked ORFs" The BA parts that can be ligated to the "ORF" parts will reconstitute these functions. For this reason BA parts are now termed "Linker" Parts. The "Linkers" can reconstitute the start and stop codons, the promoters and terminators, but they can also introduce, protein fusion linkers and protein tags. This give this year's BioByte designed added flexibility and potential for testing regulatory regions of DNA.
<-- Put picture here! -->
Byte Construction
New Biobytes are constructed with the aid of our Base Plasmids v.2. The Base Plasmids v.2 have an RFP coding cassette (J04450) flanked by BsaI cut sites that leave the appropriate overhangs to create either a AB part or a BA part. Because the BsaI restriction enzyme cuts at a site downstream of the recognition sequence, the overhang sequence can be engineered to be unique. We have designed our own overhangs that define the AB and the BA parts. To create a new part, PCR the part of interest incorporating BsaI cut sites with appropriate overhangs onto each side. Then cut the Base Plasmid v.2 and the PCR product with BsaI. Ligate it together. Again, because the overhangs are unique, the plasmid backbone can not re-ligate without an insert. The insert can only be the new part of interest, or the RFP coding cassette that was originally in the base plasmid, leading to a total of 2 possible ligation products. When transformed, the ligation products can appear red (if the original RFP cassette is reinserted) or white (if the part of interest is inserted). This provides a selection method for plasmids that have the part of interest in it.
Because all the parts are created in the same plasmid, mass production of parts for the kit is also a straight forward matter. Using universal primers of our own design, which start about 100 base before the BsaI cut sites. The PCR is then digested with BsaI. Starting the PCR 100 bases outside the part allows for us to check that the part is completely digested. Before parts are used in assembly, they are purified using weak anion exchange column through HPLC (high performance liquid chromatography).
BioBytes 2.0 vs. BioBytes
For those of you that have followed the Alberta team for the last few years, there are a few similarities between original BioByte system and the new BioBytes 2.0 system that we have put forward this year. However, if you look closely, there are a number of profound differences between the systems.
The similarities in the systems reside in the theory of alternating and complimentary ends. The AB and BA parts can only ligate to each other, and AB parts can not ligate to themselves and BA parts can not ligate to themselves. However, this year we are working with a 4 base pair overhang, and ligating the bytes together, as opposed to last year where a 12 base pair overhang was used, and the bytes were not ligated together.
The micro iron beads with the poly-T tail, as also unique to this year. Last year magnetic beads were used and the construct was released using a Uracil system. This means that the release and circularizing of the constructs of each year are unique processes.
The "BioBytes Version 2.0" construction method has been shown to create plasmids from up to 8 separate parts in an afternoon's work. This is a vast improvement.
 "
"

