Team:NYU/Assembly
From 2010.igem.org
| (7 intermediate revisions not shown) | |||
| Line 2: | Line 2: | ||
<div id="allcontent"> | <div id="allcontent"> | ||
| - | <img class="bannerimage" src="https://static.igem.org/mediawiki/2010/ | + | <img class="bannerimage" src="https://static.igem.org/mediawiki/2010/2/2d/NYU_bannerv_6.png" height="200px" width="950px"><br /> |
| Line 11: | Line 11: | ||
</li> | </li> | ||
| - | <li><a class="bannertoplinks" href=" | + | <li><a class="bannertoplinks" href="https://2010.igem.org/Team:NYU/Project">Project</a> |
<ul style="z-index:1"> | <ul style="z-index:1"> | ||
<li><a class="bannerlinks" href="https://2010.igem.org/Team:NYU/Project">Overview</a></li> | <li><a class="bannerlinks" href="https://2010.igem.org/Team:NYU/Project">Overview</a></li> | ||
<li><a class="bannerlinks" href="https://2010.igem.org/Team:NYU/Experiments">Experiments</a></li> | <li><a class="bannerlinks" href="https://2010.igem.org/Team:NYU/Experiments">Experiments</a></li> | ||
| - | <li><a class="bannerlinks" href="https://2010.igem.org/Team:NYU/Assembly">Assembly | + | <li><a class="bannerlinks" href="https://2010.igem.org/Team:NYU/Assembly">Overlap Assembly</a></li> |
<li><a class="bannerlinks" href="https://2010.igem.org/Team:NYU/Notebook">Notebook</a></li> | <li><a class="bannerlinks" href="https://2010.igem.org/Team:NYU/Notebook">Notebook</a></li> | ||
<li><a class="bannerlinks" href="https://2010.igem.org/Team:NYU/Parts">Biobricks</a></li> | <li><a class="bannerlinks" href="https://2010.igem.org/Team:NYU/Parts">Biobricks</a></li> | ||
| Line 21: | Line 21: | ||
</ul> | </ul> | ||
</li> | </li> | ||
| - | <li><a class="bannertoplinks" href=" | + | <li><a class="bannertoplinks" href="https://2010.igem.org/Team:NYU/Team">Team</a> |
<ul style="z-index:1"> | <ul style="z-index:1"> | ||
<li><a class="bannerlinks" href="https://2010.igem.org/Team:NYU/Team">NYU</a></li> | <li><a class="bannerlinks" href="https://2010.igem.org/Team:NYU/Team">NYU</a></li> | ||
| Line 27: | Line 27: | ||
</ul> | </ul> | ||
</li> | </li> | ||
| - | <li><a class="bannertoplinks" href=" | + | <li><a class="bannertoplinks" href="https://2010.igem.org/Team:NYU/Sponsors">Sponsors</a> |
<ul style="z-index:1"> | <ul style="z-index:1"> | ||
<li><a class="bannerlinks" href="https://2010.igem.org/Team:NYU/Sponsors">Sponsors</a></li> | <li><a class="bannerlinks" href="https://2010.igem.org/Team:NYU/Sponsors">Sponsors</a></li> | ||
<li><a class="bannerlinks" href="http://www.sciencehouse.com">ScienceHouse</a></li> | <li><a class="bannerlinks" href="http://www.sciencehouse.com">ScienceHouse</a></li> | ||
| + | <li><a class="bannerlinks" href="http://www.nysynbio.org">NY synbio</a></li> | ||
</ul> | </ul> | ||
</li> | </li> | ||
| - | <li><a class="bannertoplinks" href=" | + | <li><a class="bannertoplinks" href="https://2010.igem.org/Team:NYU/Contact">Contact Us</a> |
| - | + | ||
| - | + | ||
| - | + | ||
</li> | </li> | ||
</ul> | </ul> | ||
| Line 176: | Line 175: | ||
padding: 3px 20px 3px 20px; | padding: 3px 20px 3px 20px; | ||
} | } | ||
| - | |||
| - | |||
| - | |||
| - | |||
| - | |||
| - | |||
| - | |||
| - | |||
| - | |||
| - | |||
| - | |||
| - | |||
| - | |||
| - | |||
| - | |||
| - | |||
| - | |||
| - | |||
| - | |||
| - | |||
| - | |||
| - | |||
| - | |||
| - | |||
| - | |||
| - | |||
| - | |||
| - | |||
| - | |||
#sidebar { | #sidebar { | ||
| Line 284: | Line 254: | ||
</style> | </style> | ||
| - | <!-- !END NYU | + | <!-- !END NYU CSS- Thanks Harvard --> |
</html> | </html> | ||
| + | |||
| + | [[Image:NYU_OverviewSideF_3.png|200px|right]] | ||
While the 3A assembly method is well suited for stepwise building of devices, larger complex constructs can take time to make. Being the impatient New Yorkers we are, as soon as we came up with the constructs for our project we had to have them immediately. Because of this, we began exploring other methods to piece together our system. | While the 3A assembly method is well suited for stepwise building of devices, larger complex constructs can take time to make. Being the impatient New Yorkers we are, as soon as we came up with the constructs for our project we had to have them immediately. Because of this, we began exploring other methods to piece together our system. | ||
We decided to use the Overlap Assembly Method most famously published in this JCVI paper: | We decided to use the Overlap Assembly Method most famously published in this JCVI paper: | ||
| + | |||
[http://www.nature.com/nmeth/journal/v6/n5/abs/nmeth.1318.html Gibson et al, Nature Methods 6: 343-345] | [http://www.nature.com/nmeth/journal/v6/n5/abs/nmeth.1318.html Gibson et al, Nature Methods 6: 343-345] | ||
| - | This method allows researchers to assemble complex systems of many parts all at once rather than in a stepwise fashion. The downside of this system is that the parts to be assembled must overlap one another in their sequence, so you must order DNA oligos to PCR | + | |
| + | This method allows researchers to assemble complex systems of many parts all at once rather than in a stepwise fashion. By combining your overlapping DNA parts with the required enzymes and buffers you can easily assemble a complete system in one day - perfect for the impatient New Yorkers that we are. Here's the general scheme of this reaction: | ||
| + | |||
| + | [[Image:NYU_Overlapassembly.jpg|300px|center]] | ||
| + | |||
| + | |||
| + | |||
| + | The downside of this system is that the parts to be assembled must overlap one another in their sequence, so you must order DNA oligos to PCR your parts into an overlapping form. To help us out with this, Russell programmed an overlap oligo maker that did much of the work for us - check it out by clicking this link: | ||
<html> | <html> | ||
<a href="http://www.russelldurrett.com/overlapoligos.html"><img src="https://static.igem.org/mediawiki/2010/5/5c/Overlaplogo.gif" /></a></html> | <a href="http://www.russelldurrett.com/overlapoligos.html"><img src="https://static.igem.org/mediawiki/2010/5/5c/Overlaplogo.gif" /></a></html> | ||
| + | After getting the oligos in the lab we combined equimolar amounts of each part in a single reaction and added ExoIII, Phusion polymerase and Taq Ligase. We opted for a 2-step thermocycled reaction method for simplicity and cost-effectiveness and the relative ease of making a reaction mix. Using the reaction mix suggested in the Gibson et. al. paper, Russell designed a simplified version by using the Phusion and Ligase prepared buffers. We were able to get successful reactions from this simple mix: | ||
| + | |||
| + | 50uL Assembly Reaction: | ||
| + | |||
| + | Equimolar amounts of overlapping DNA (~100ng) from PCR cleanup - up to 18uL | ||
| + | + | ||
| + | 10uL 5x Phusion HF Polymerase Buffer | ||
| + | 5uL 10x Taq Ligase Buffer | ||
| + | 8uL 50mM MgCl2 | ||
| + | 4uL 2.5mM dNTPs | ||
| + | + | ||
| + | .5uL ExoIII diluted to 10 U/uL | ||
| + | 2uL Phusion HF Polymerase (courtesy of Finnzyme)@ 2 U/uL | ||
| + | 4uL Taq Ligase @ 40 U/uL | ||
| + | + | ||
| + | Water to 50uL | ||
| + | |||
| + | |||
| + | We kept this reaction mix at 50C for 60 seconds to let the ExoIII digest our DNA, then heat inactivated it by keeping it at 75C for 20 minutes. When cooled down to 60C at a very slow ramp rate the now-single-stranded parts anneal to one another, allowing the Phusion polymerase and Taq ligase to fill in and closed the gaps. Because the yields are too low to clone directly from this reaction we PCRed full constructs using BB prefix and suffix primers and high fidelity polymerase which could then be cloned into a biobrick-compatible plasmid. | ||
| - | |||
| - | + | [[Image:Overlap_gel.jpg|400px|right]] | |
| + | To ensure that we actually had our construct of interest we ran a diagnostic PCR to see what parts had actually ligated together in our reaction. Because we already obtained forward and reverse PCR oligos for each part, it was relatively easy to visualize the stepwise progression of the assembly by making PCR reactions with a Biobrick forward primer and each part reverse primer. A typical (successful) diagnostic PCR looks like this: | ||
| - | + | Then all you need to do is make a larger PCR reaction using the Biobrick forward and reverse primers and you're set! | |
Latest revision as of 09:13, 27 October 2010

While the 3A assembly method is well suited for stepwise building of devices, larger complex constructs can take time to make. Being the impatient New Yorkers we are, as soon as we came up with the constructs for our project we had to have them immediately. Because of this, we began exploring other methods to piece together our system.
We decided to use the Overlap Assembly Method most famously published in this JCVI paper:
[http://www.nature.com/nmeth/journal/v6/n5/abs/nmeth.1318.html Gibson et al, Nature Methods 6: 343-345]
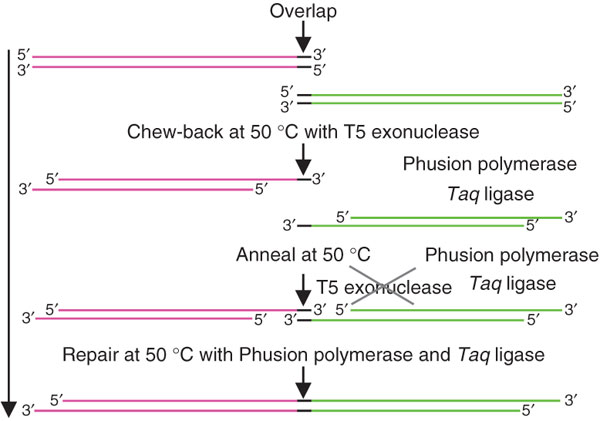
This method allows researchers to assemble complex systems of many parts all at once rather than in a stepwise fashion. By combining your overlapping DNA parts with the required enzymes and buffers you can easily assemble a complete system in one day - perfect for the impatient New Yorkers that we are. Here's the general scheme of this reaction:
The downside of this system is that the parts to be assembled must overlap one another in their sequence, so you must order DNA oligos to PCR your parts into an overlapping form. To help us out with this, Russell programmed an overlap oligo maker that did much of the work for us - check it out by clicking this link:
After getting the oligos in the lab we combined equimolar amounts of each part in a single reaction and added ExoIII, Phusion polymerase and Taq Ligase. We opted for a 2-step thermocycled reaction method for simplicity and cost-effectiveness and the relative ease of making a reaction mix. Using the reaction mix suggested in the Gibson et. al. paper, Russell designed a simplified version by using the Phusion and Ligase prepared buffers. We were able to get successful reactions from this simple mix:
50uL Assembly Reaction:

  Equimolar amounts of overlapping DNA (~100ng) from PCR cleanup - up to 18uL
      +
  10uL  5x Phusion HF Polymerase Buffer
  5uL   10x Taq Ligase Buffer
  8uL   50mM MgCl2
  4uL   2.5mM dNTPs
      +
  .5uL  ExoIII diluted to 10 U/uL
  2uL   Phusion HF Polymerase (courtesy of Finnzyme)@ 2 U/uL
  4uL   Taq Ligase @ 40 U/uL
      +
  Water to 50uL
We kept this reaction mix at 50C for 60 seconds to let the ExoIII digest our DNA, then heat inactivated it by keeping it at 75C for 20 minutes. When cooled down to 60C at a very slow ramp rate the now-single-stranded parts anneal to one another, allowing the Phusion polymerase and Taq ligase to fill in and closed the gaps. Because the yields are too low to clone directly from this reaction we PCRed full constructs using BB prefix and suffix primers and high fidelity polymerase which could then be cloned into a biobrick-compatible plasmid.
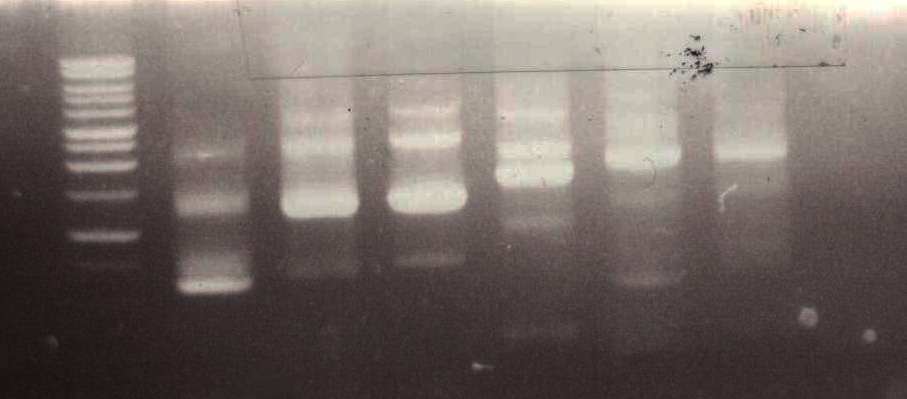
To ensure that we actually had our construct of interest we ran a diagnostic PCR to see what parts had actually ligated together in our reaction. Because we already obtained forward and reverse PCR oligos for each part, it was relatively easy to visualize the stepwise progression of the assembly by making PCR reactions with a Biobrick forward primer and each part reverse primer. A typical (successful) diagnostic PCR looks like this:
Then all you need to do is make a larger PCR reaction using the Biobrick forward and reverse primers and you're set!
 "
"


